11 Doorless Walk-In Shower Design Ideas
It’s time to say goodbye to your busted and worn-out shower curtain. Your master bathroom deserves better. Modern design trends embrace the idea of having a separate shower and tub area in your bathroom. Consider taking this approach with your bathroom remodel.
These doorless walk-in shower ideas will show you that walk-in showers are the future of bathroom design. Even if you already have a walk-in shower, these ideas will show you that it’s time for an update. Consider replacing your shoer’s tired design and replacing it with one that uses frameless glass or an open concept.
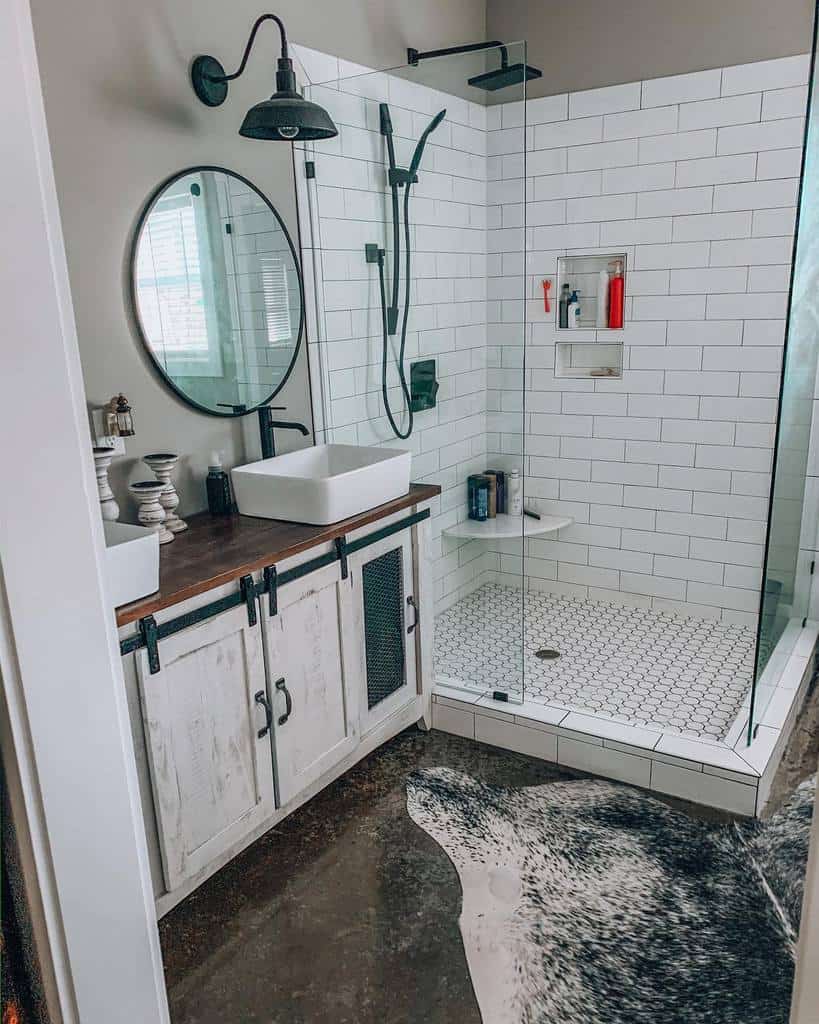
1. Maximize Space with Corner Showers
A corner shower design can give you plenty of shower stall space and make it easy to not have a door. Work with your shower to have the showerhead point in a direction that avoids water from flowing directly out of the shower.


For a stylish look, try having the entrance to your shower be on the corner. Then you’ll have two dividers on either side to enclose the shower in. This is nice because it cuts down on the drafts that you could experience with other styles.
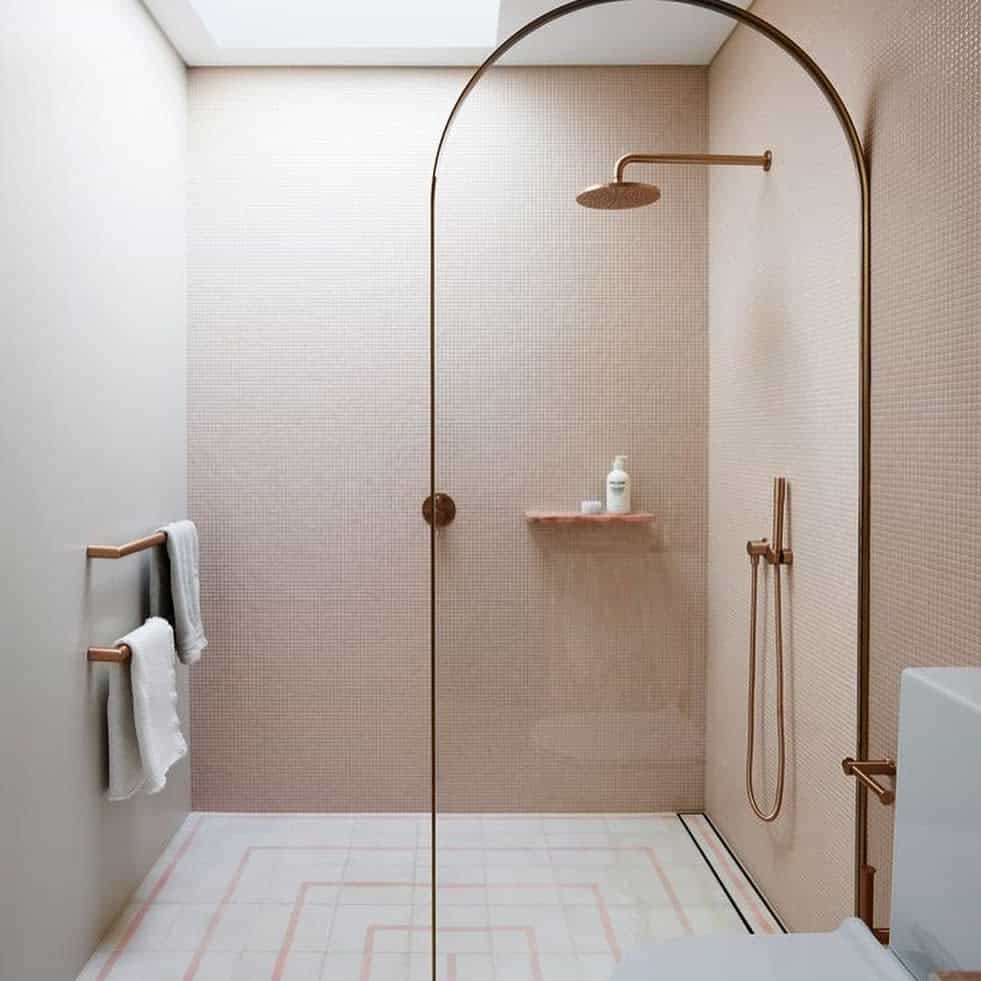
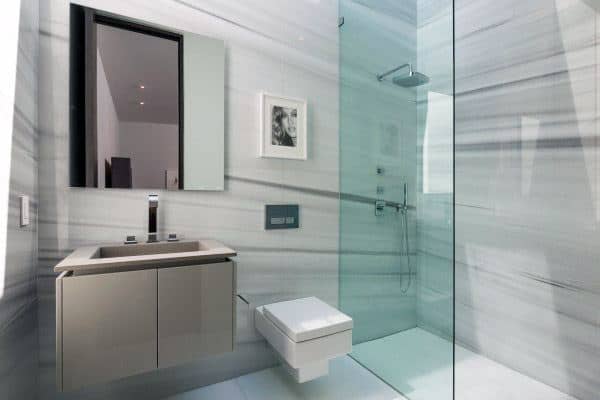
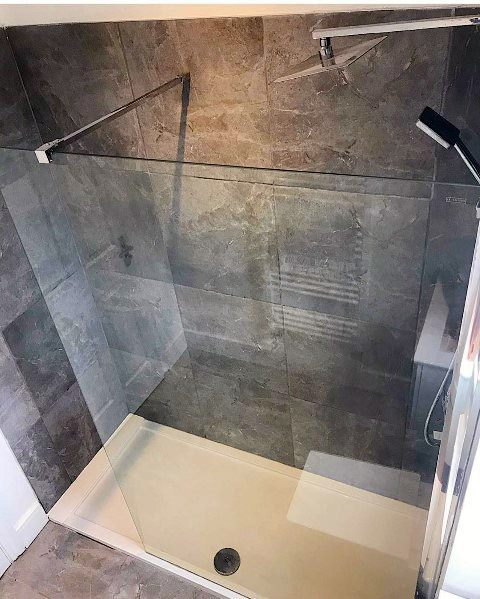
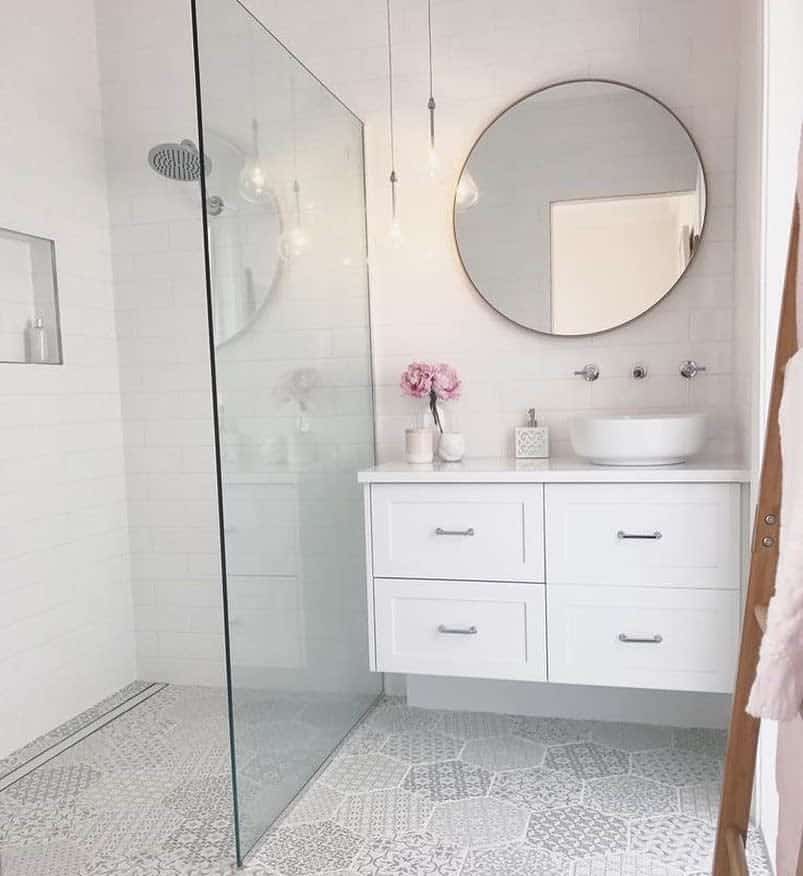
2. Elegant Glass Partitions for Openness
The simplest way to build a shower without a door is with glass. Skip the glass block wall though. This type of shower glass is outdated and will immediately age your bathroom.
Instead, use a single large pane of glass to create a shower wall. You could use more than one glass sheet to build a multi-sided glass shower enclosure.


You want to leave enough open space to walk in and out of the shower comfortably. However, you don’t want the space to be so large that it allows water to splash out into the bathroom. Consider the direction the showerhead points when installing the glass divider.
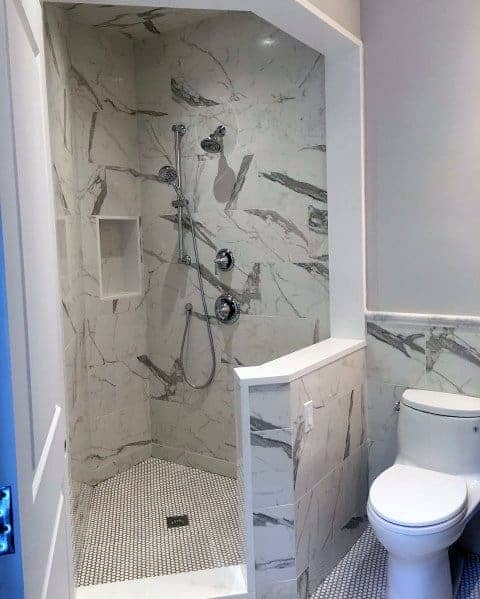
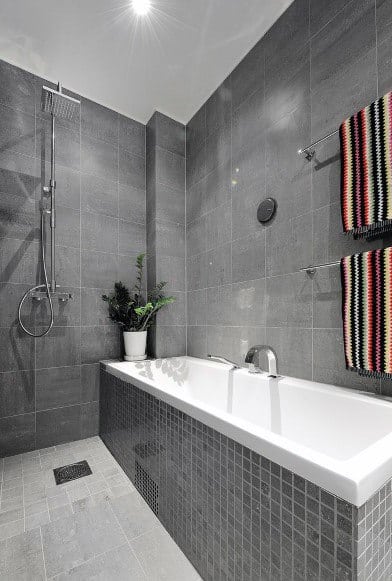
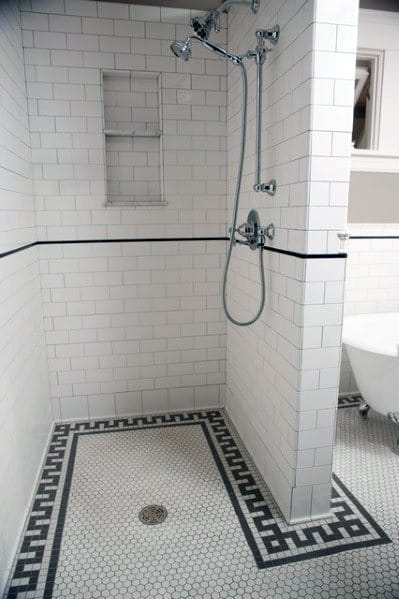
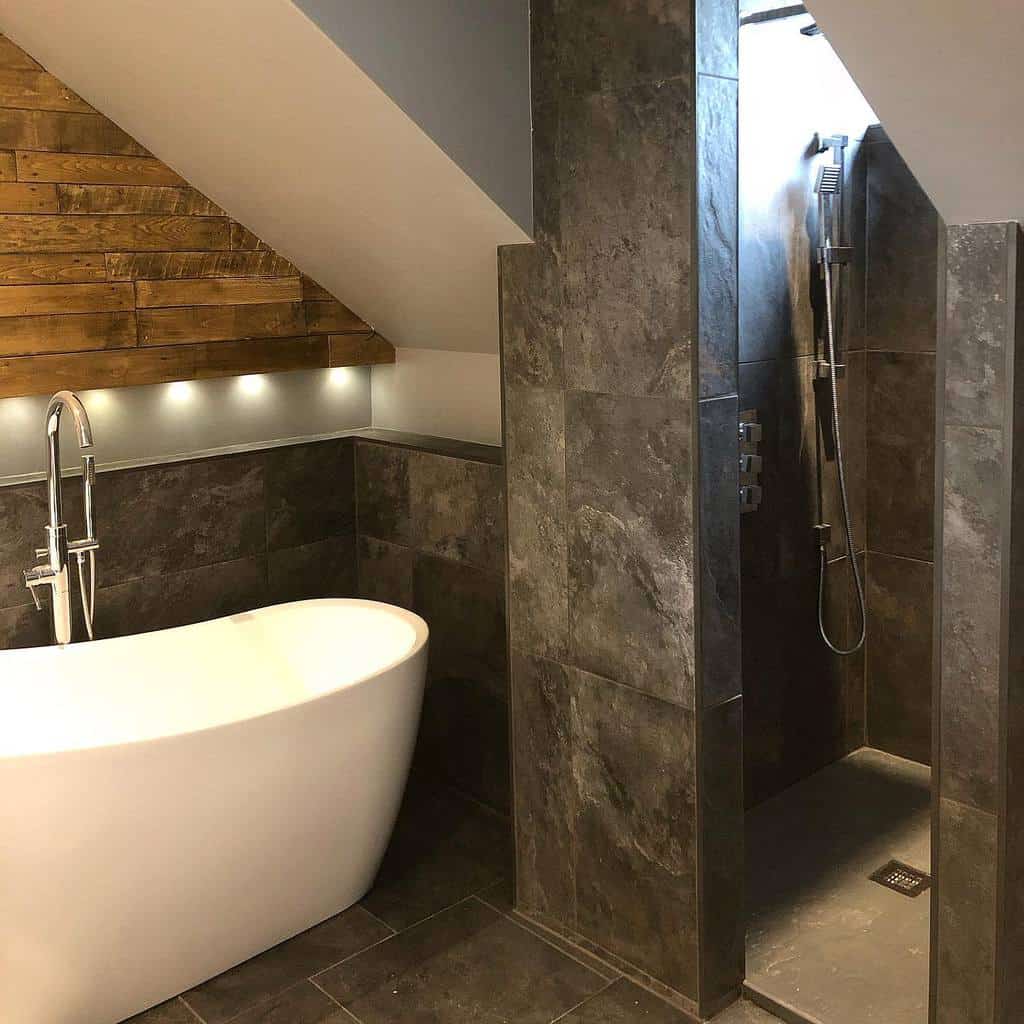
3. Half Wall Partitions for Stylish Privacy
Instead of having a floor to ceiling sheet of glass, you can have a roman shower. The shower area will be large with one or more showerheads. This is more like a shower room than a shower stall.


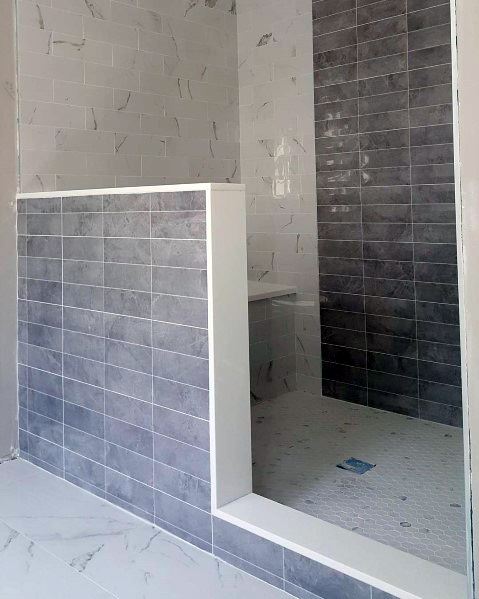
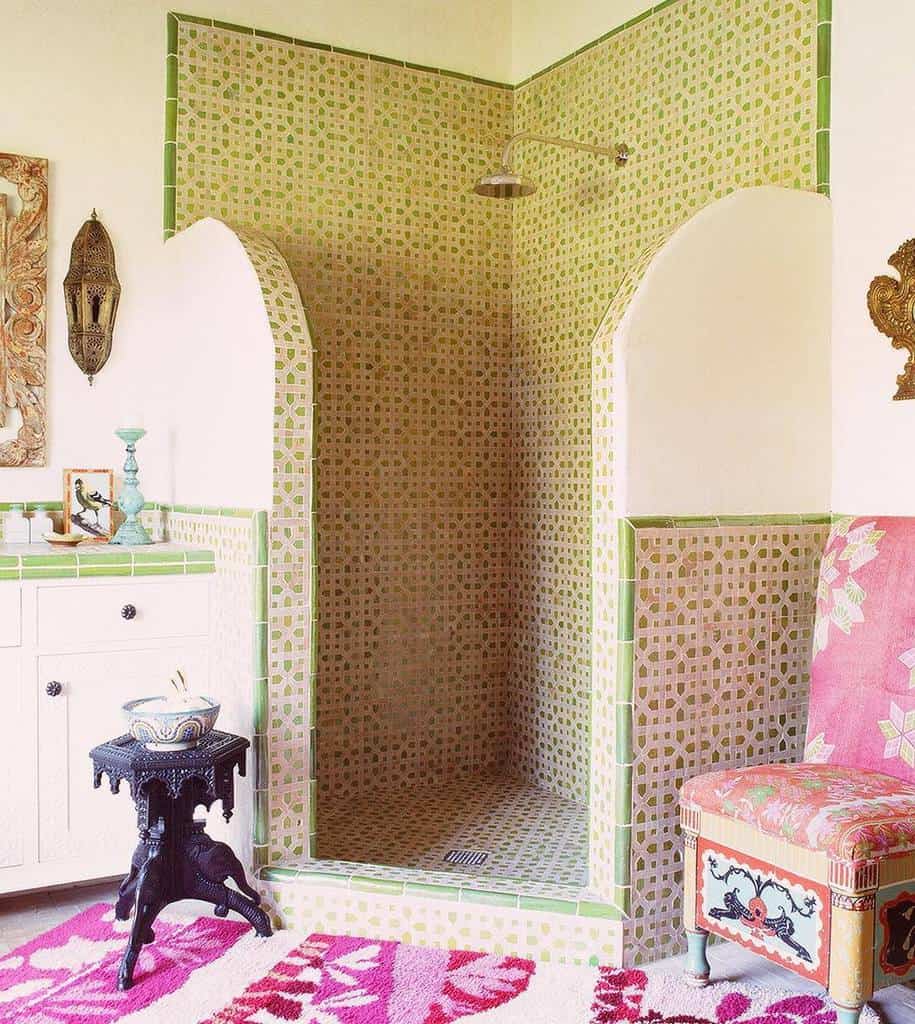
There will be an opening that you walk through to get in and out of the shower enclosure. Then the walls will be solid and covered in tile, usually a mosaic tile. They will come up to about waist height, leaving the space above them open.
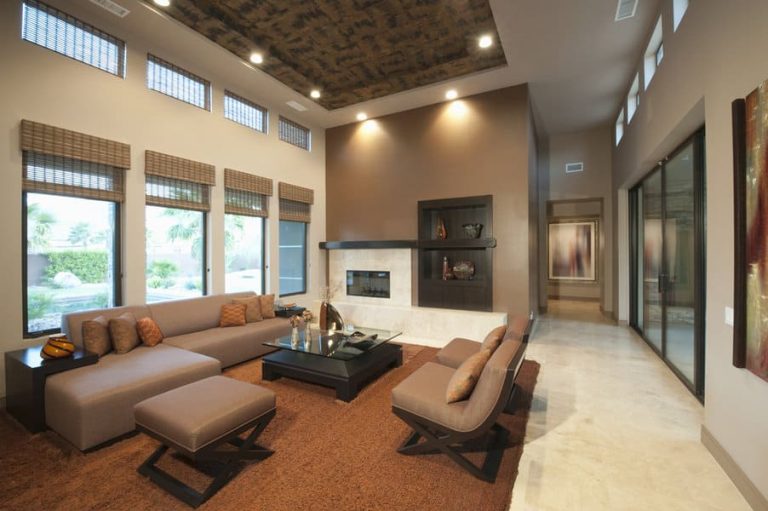
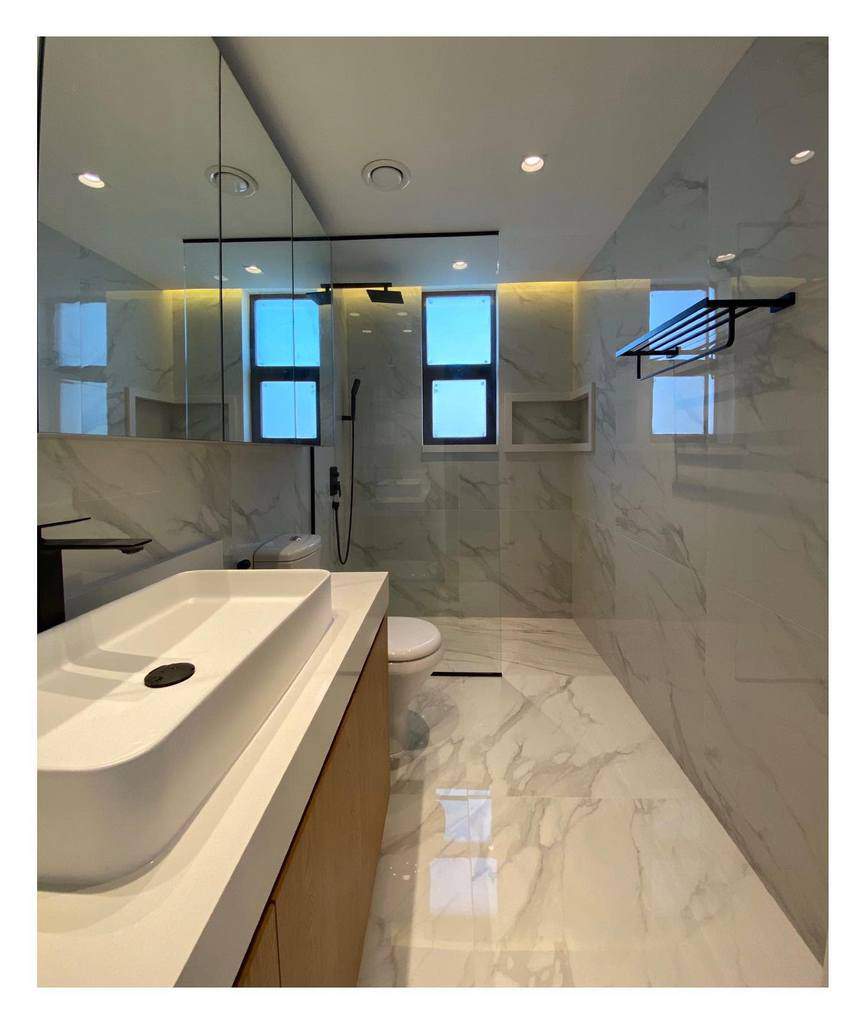
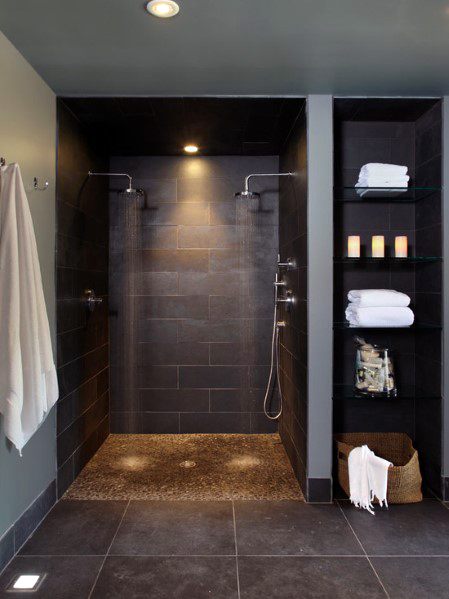
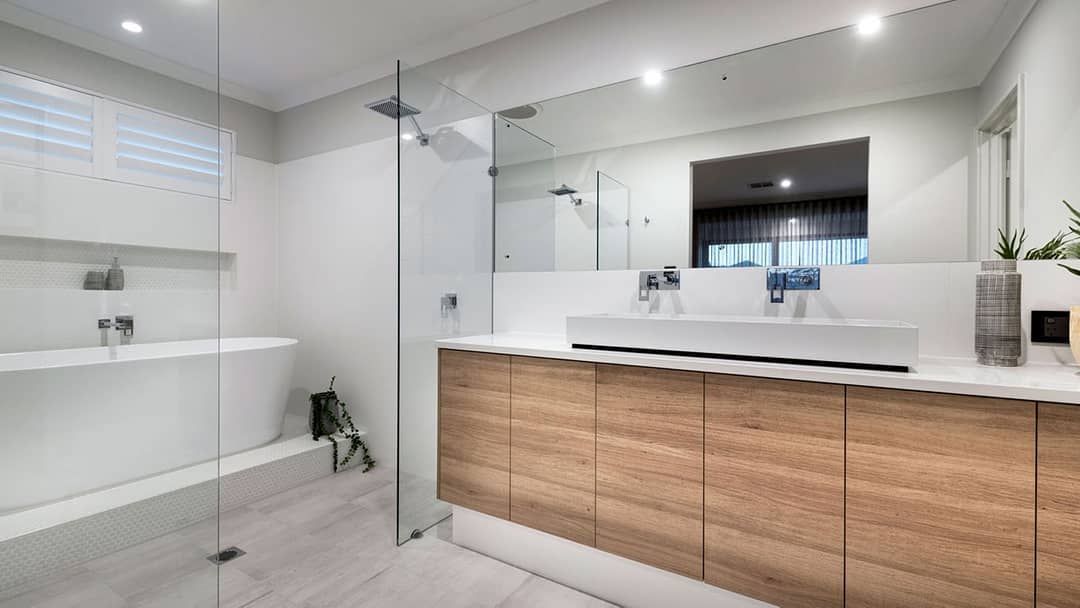
4. Embrace Spaciousness in Large Showers
A large open shower gives you plenty of space to spread out and stretch while you’re showering. However, this also means that you’ll have to spend more to finish your tile shower.


Skip the small penny and mosaic tile for this job. It’ll cost a fortune to lay, and the small pattern will look overwhelming. Try using extra-large tiles. They could be large squares or rectangles. Opt for thin grout lines to avoid breaking up the visual lines.
Remember that large showers that lack a door have a greater risk of feeling cold and drafty. You can prevent this by putting heating elements under the tile. This will warm the tile under your feet and warm the space. You can also install a fan that will keep the warm air circulating in the shower.
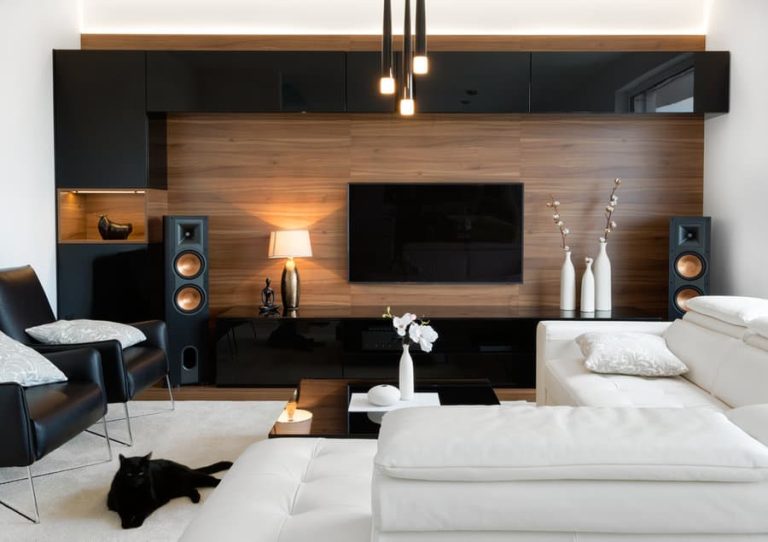
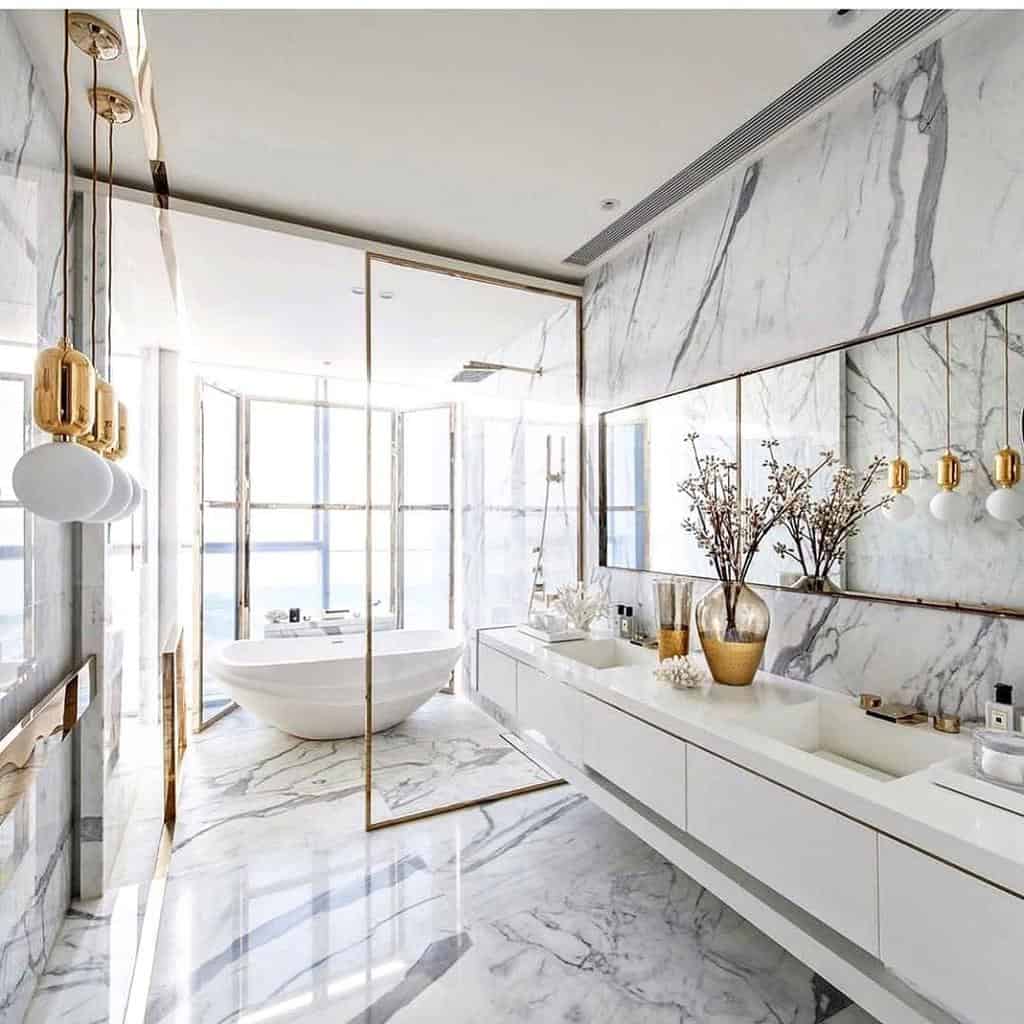
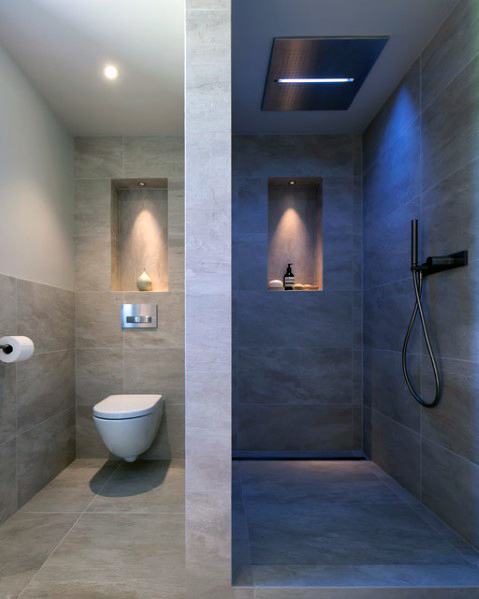
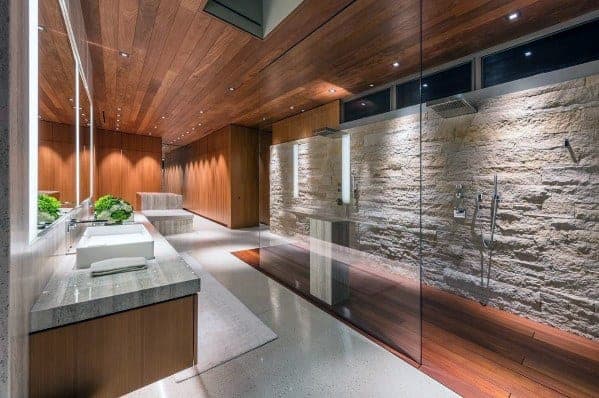
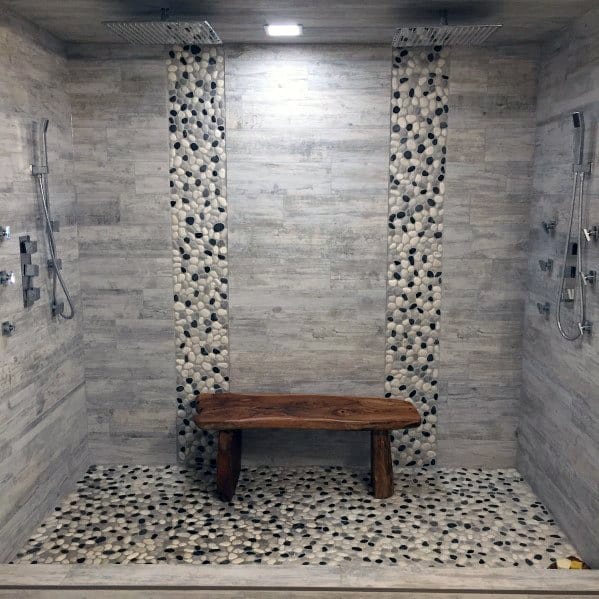
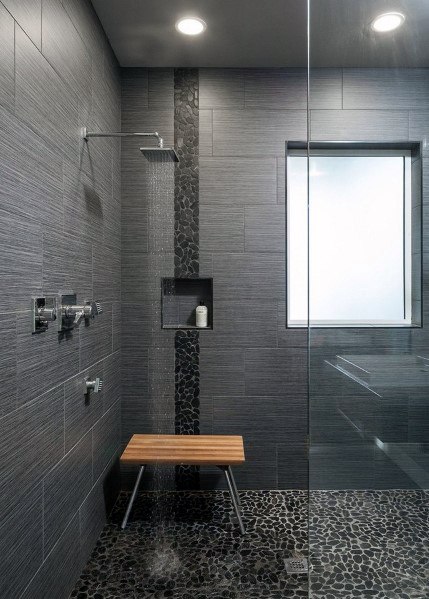
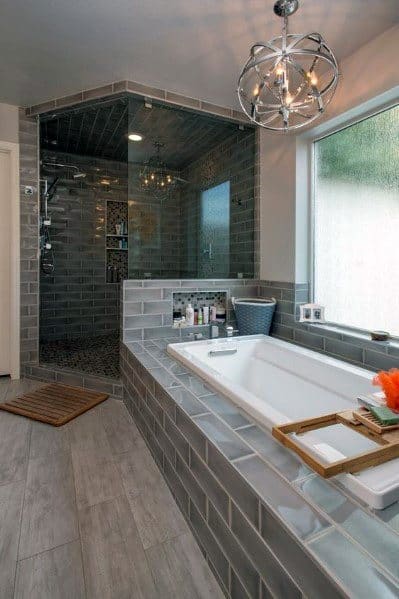
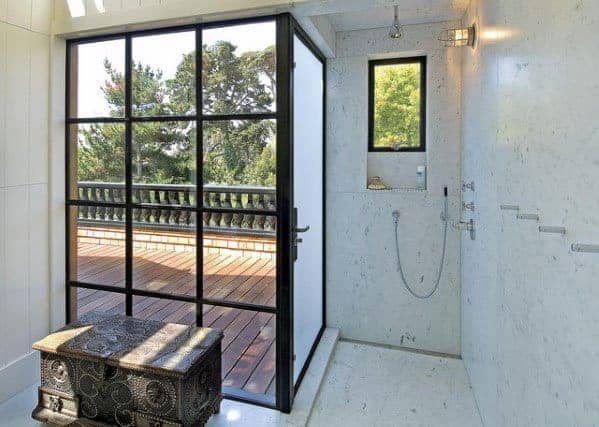
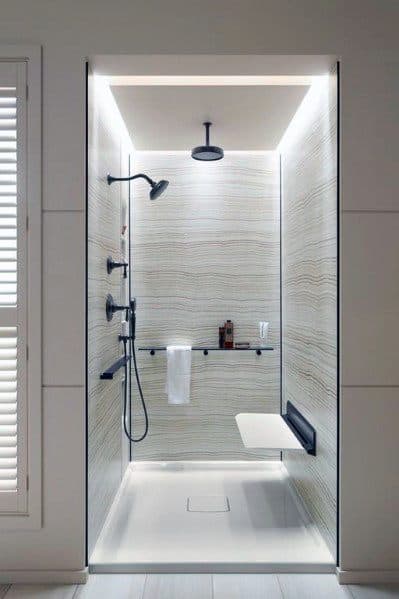
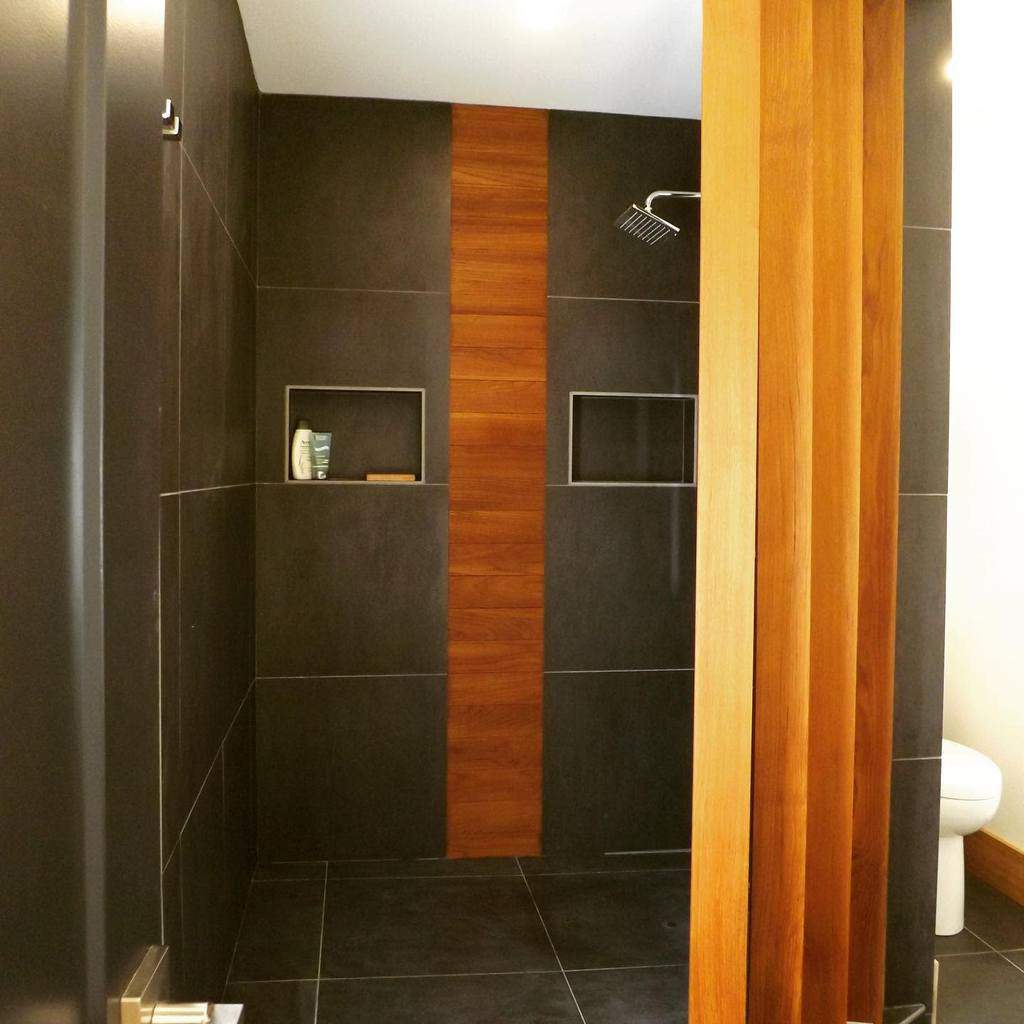
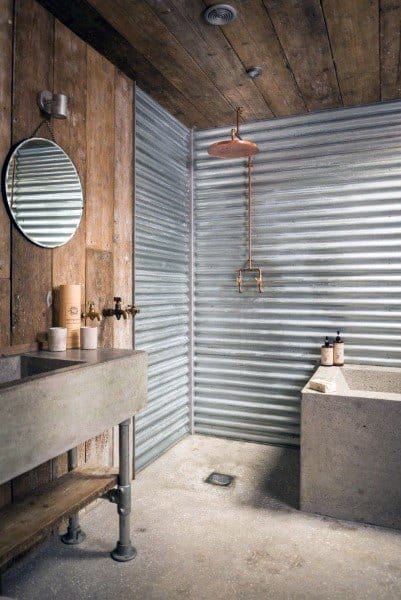
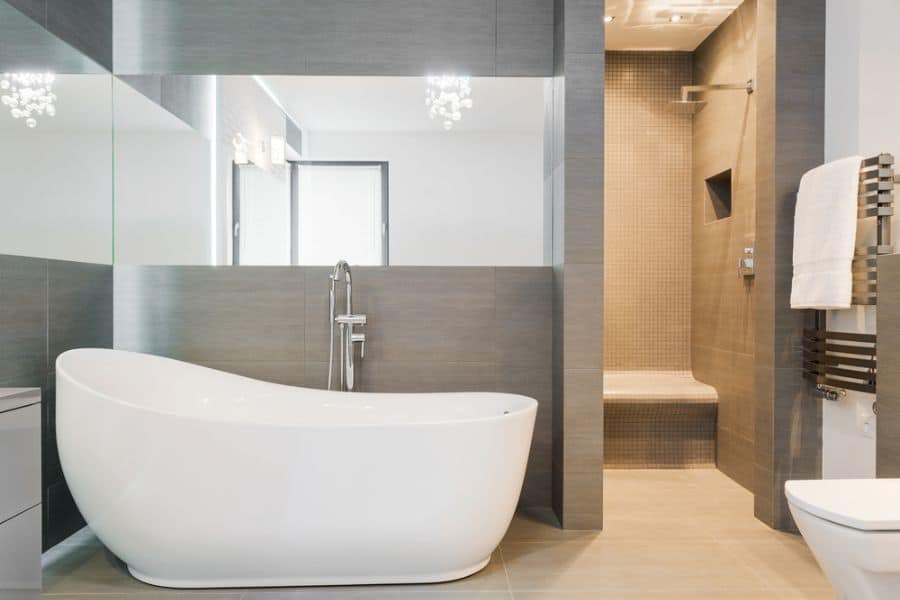
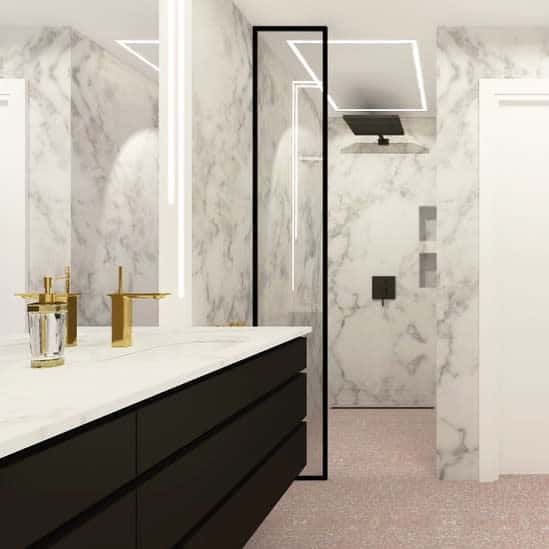
5. Infuse Luxury in Your Shower Design
Doorless showers are traditionally a feature of luxury bathrooms. While they have become more popular, you can make your master bath stand out by incorporating elegant features you only find in luxury homes. The first thing you should do is add a seat. It could be a bench built into the shower.


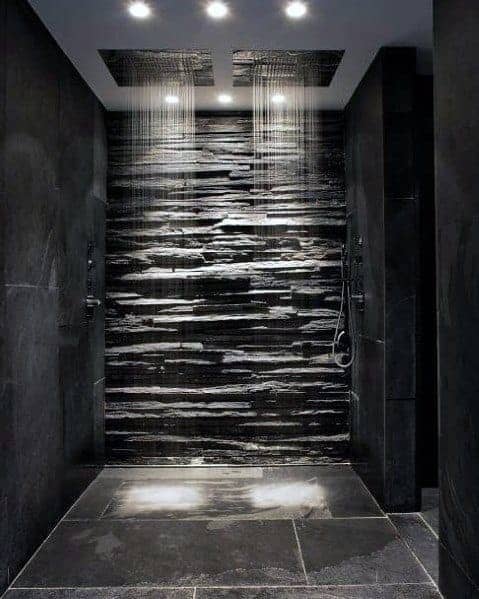
You should also change out the showerhead to one that will give you a luxurious experience while showering. This could be a rain shower, one with multiple showerheads, one that has a light integrated into it, or one that can add aromatherapy to your shower.
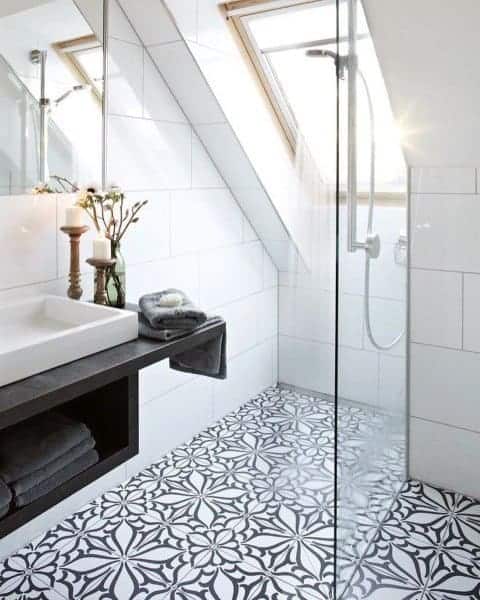
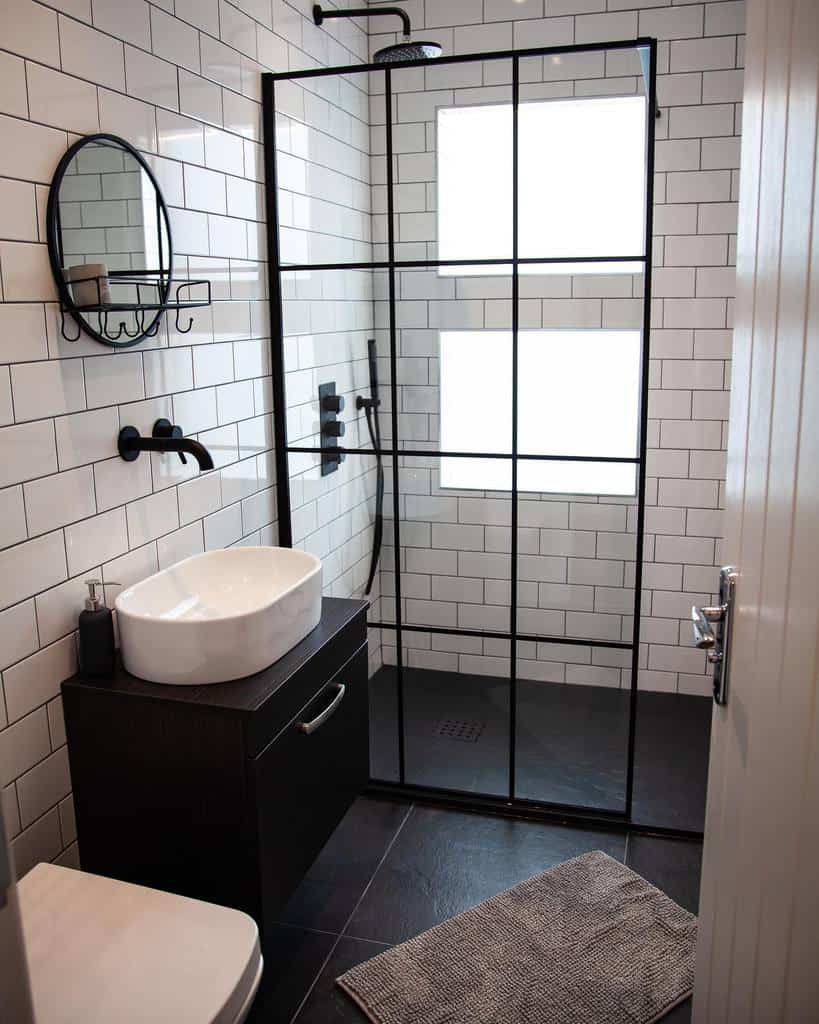
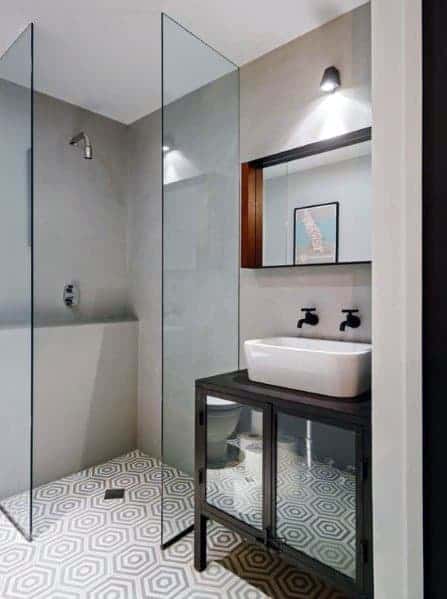
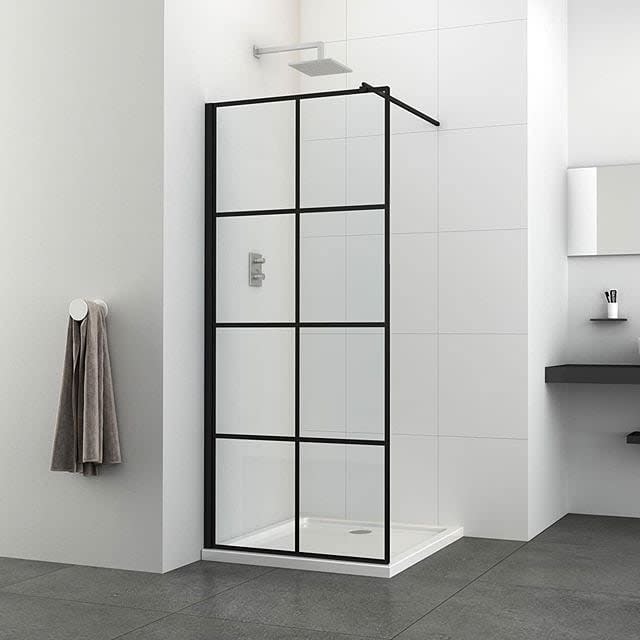
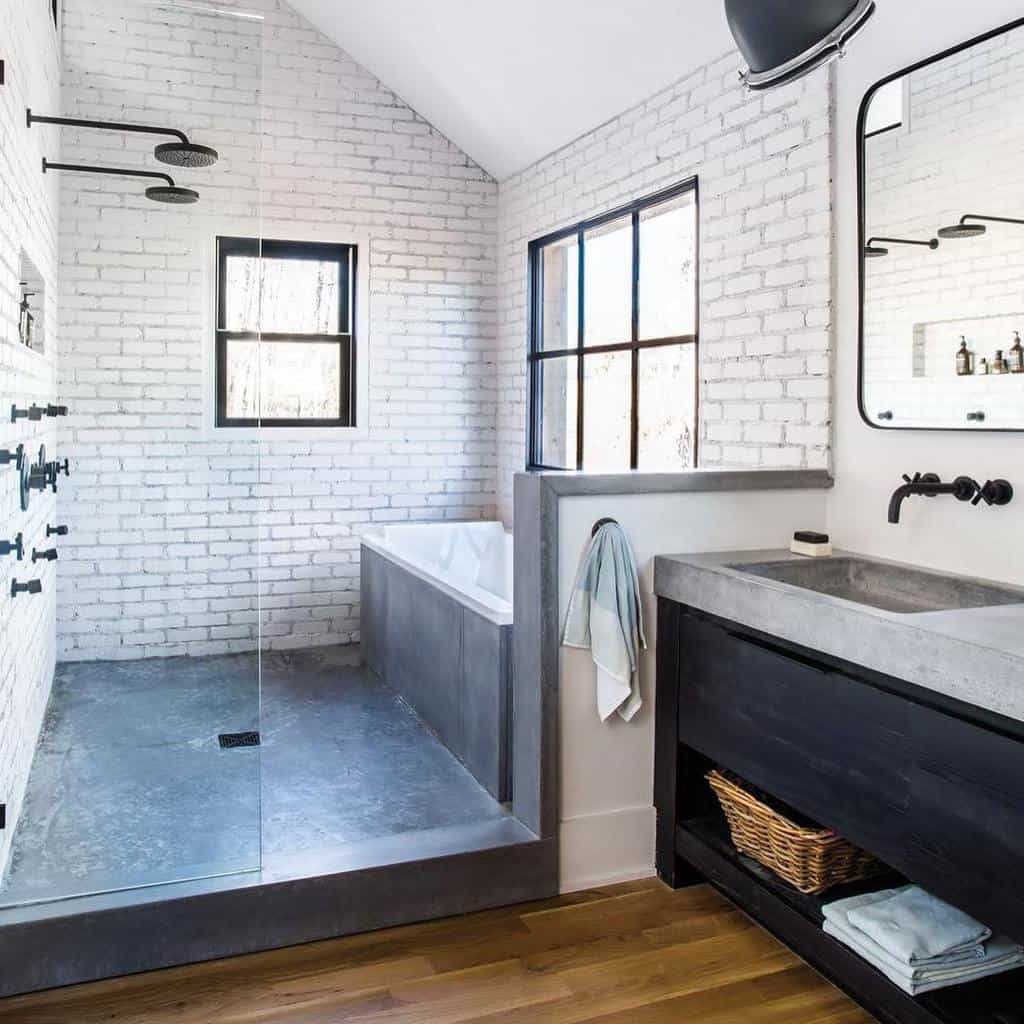
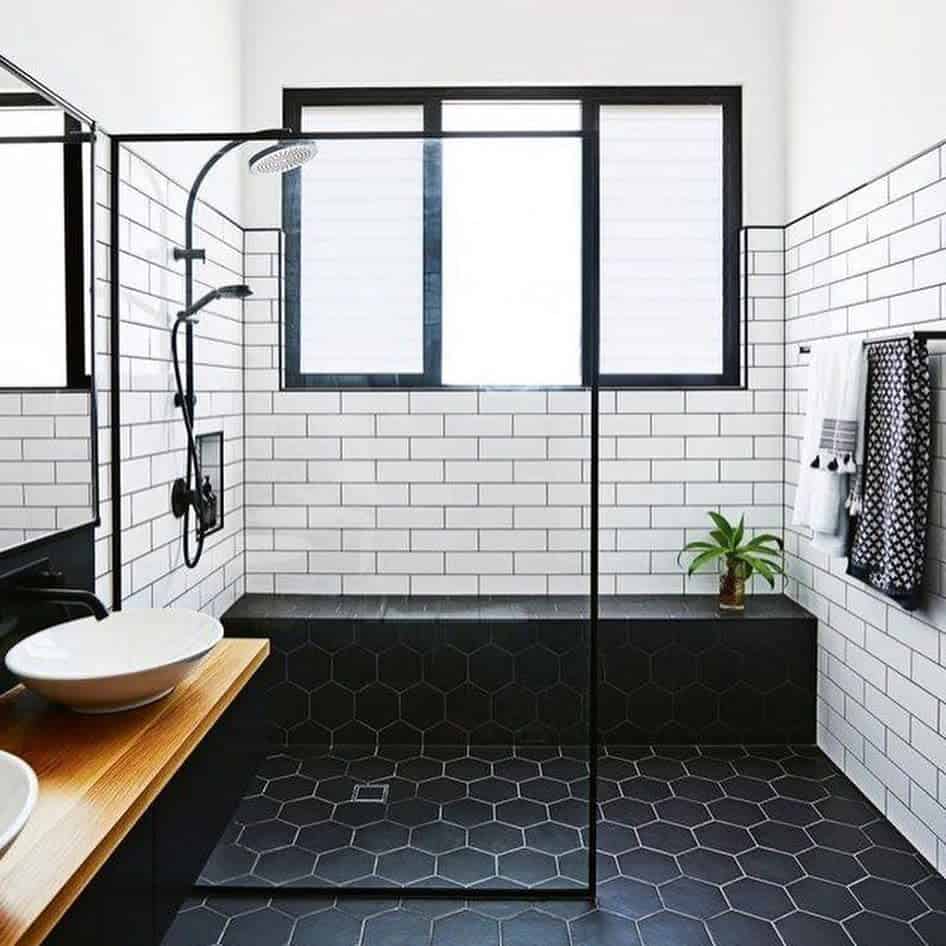
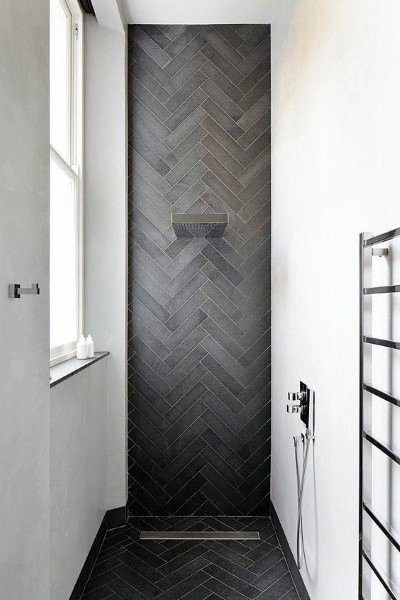
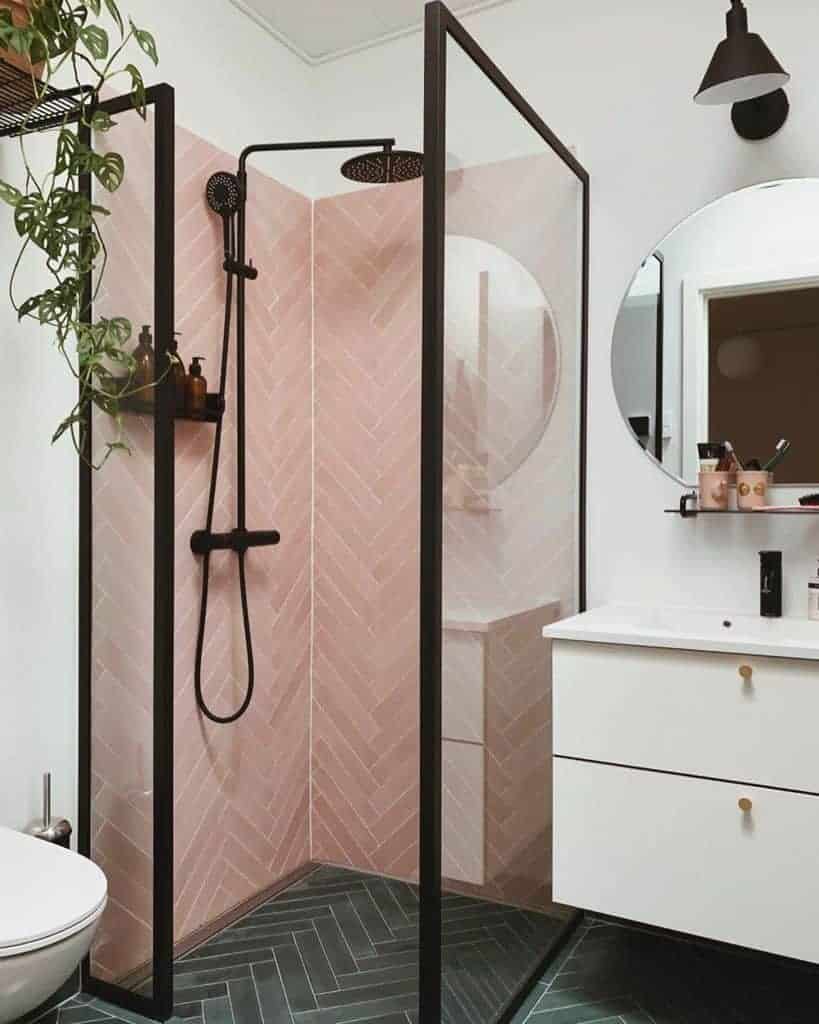
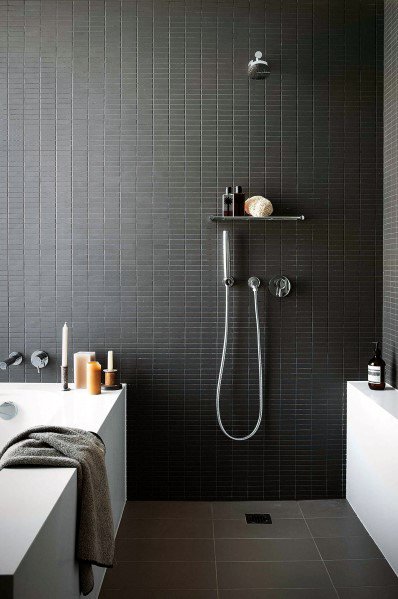
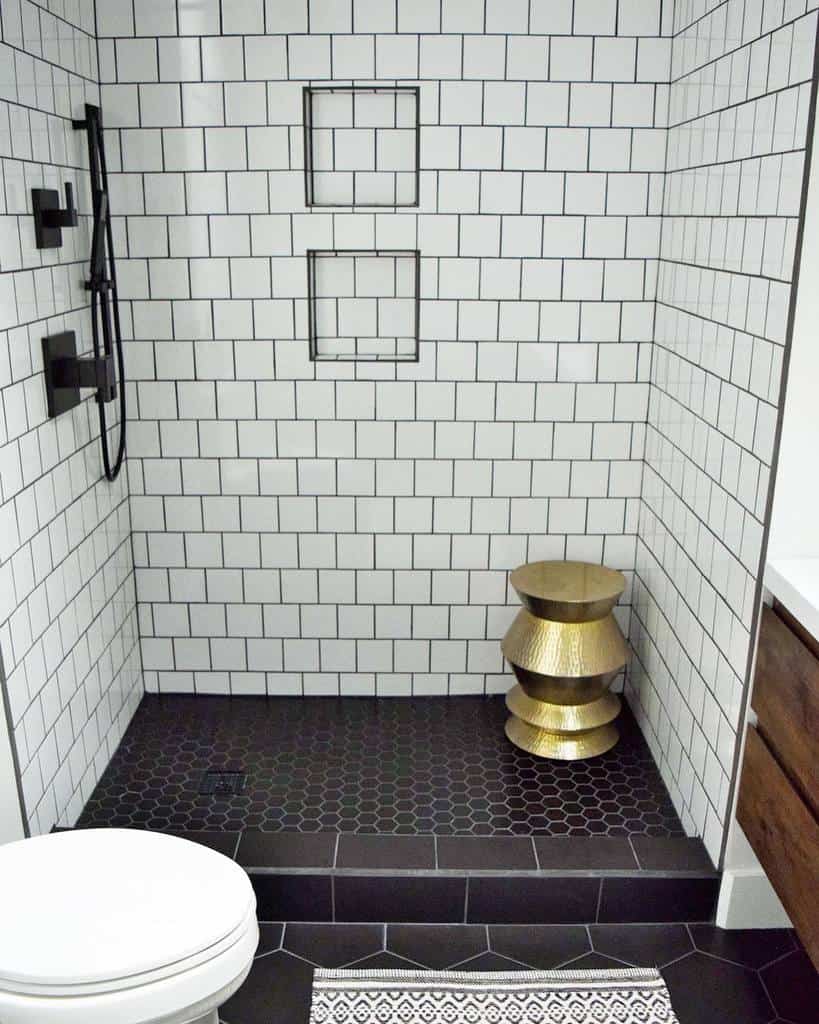
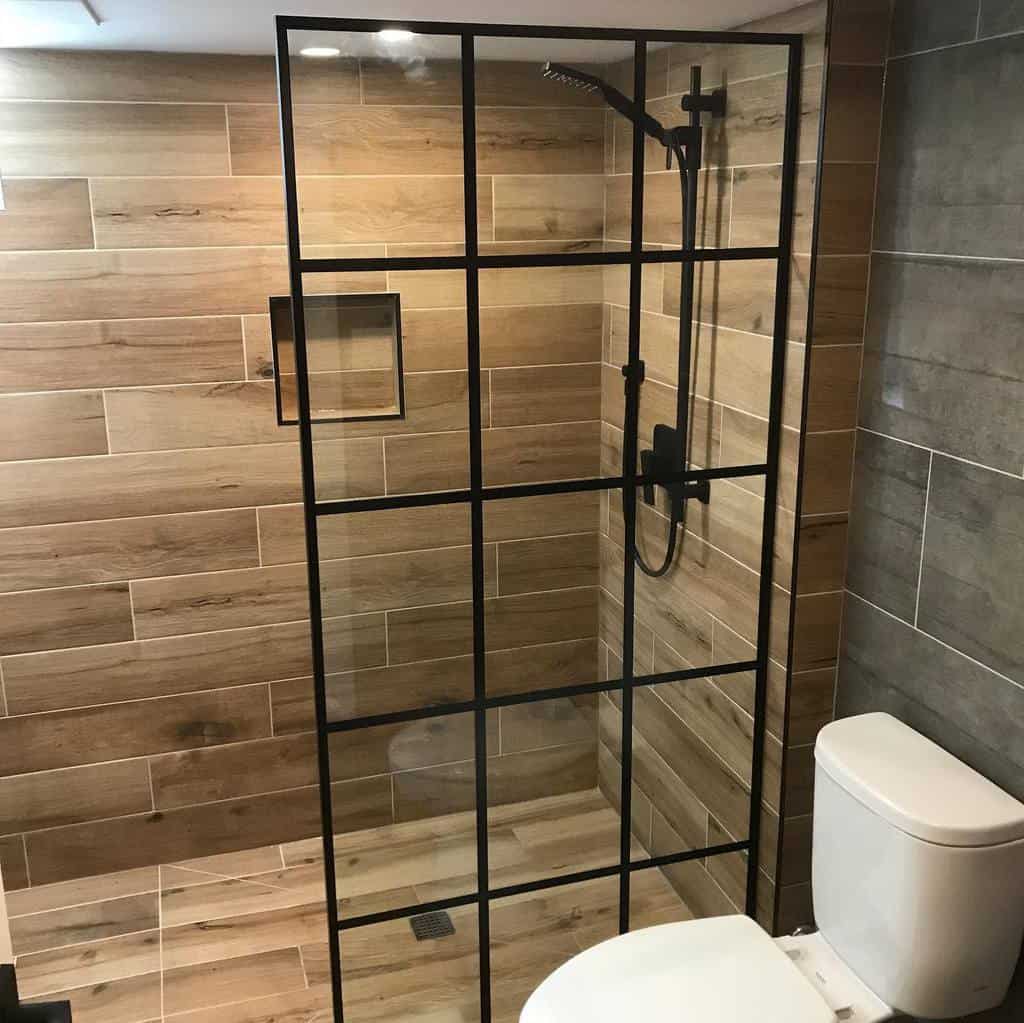
6. Sleek Minimalism in Shower Spaces
Minimalism is all about keeping the design clean and simple. A doorless bathroom shower blends perfectly with this. While a frameless shower door looks modern, it isn’t the best option for a minimalist bathroom.
Instead, install one that has a thick black frame around it. This creates the straight lines and crisp corners that you see in minimalist designs.


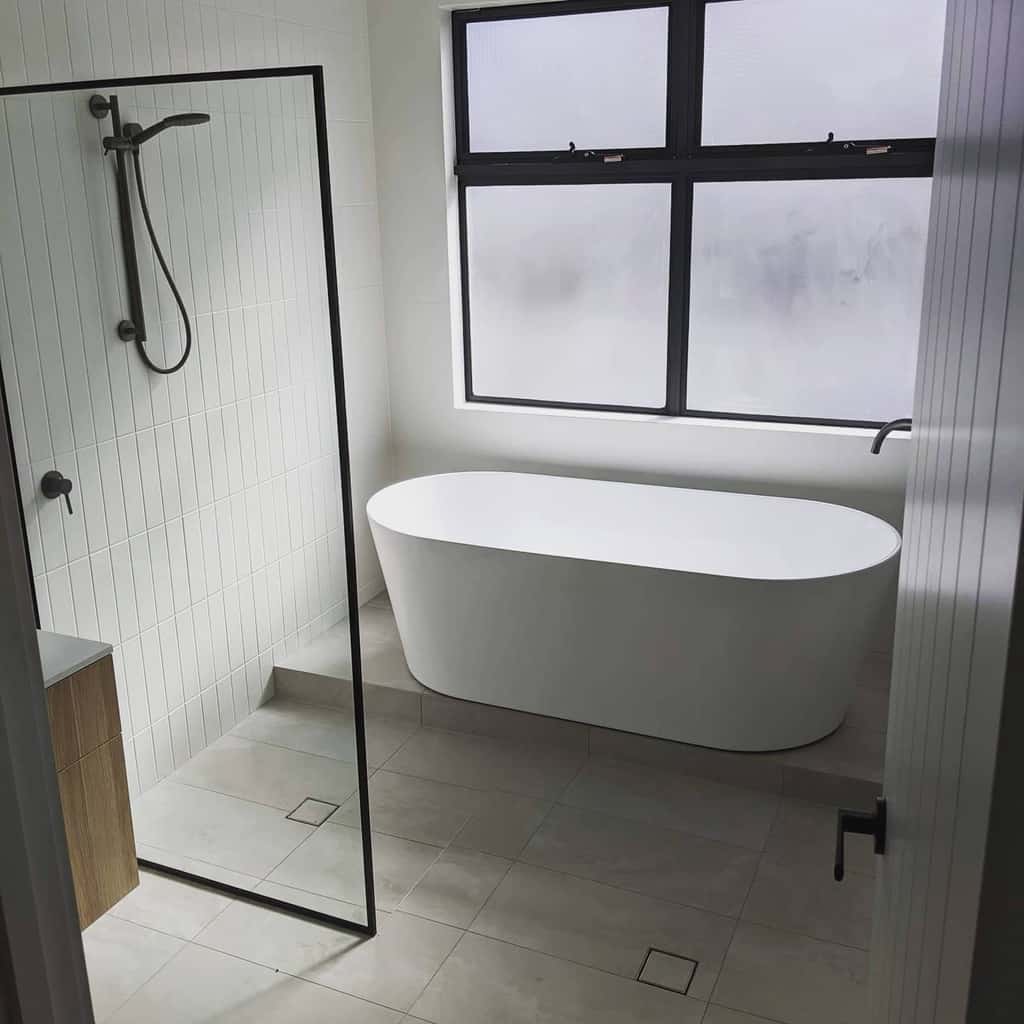
Use a white tile with white grout to create a uniform look. A dark tile and grout on the floor will balance it. You can then finish the look with black plumbing hardware and light fixtures.
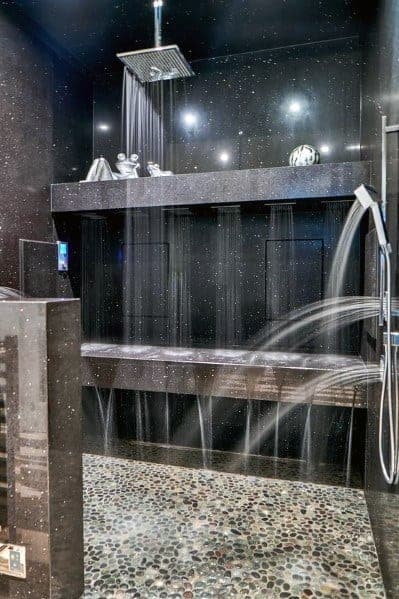
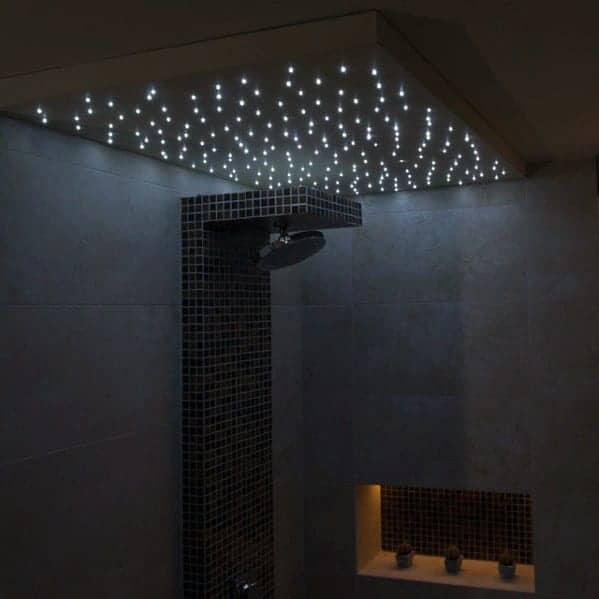
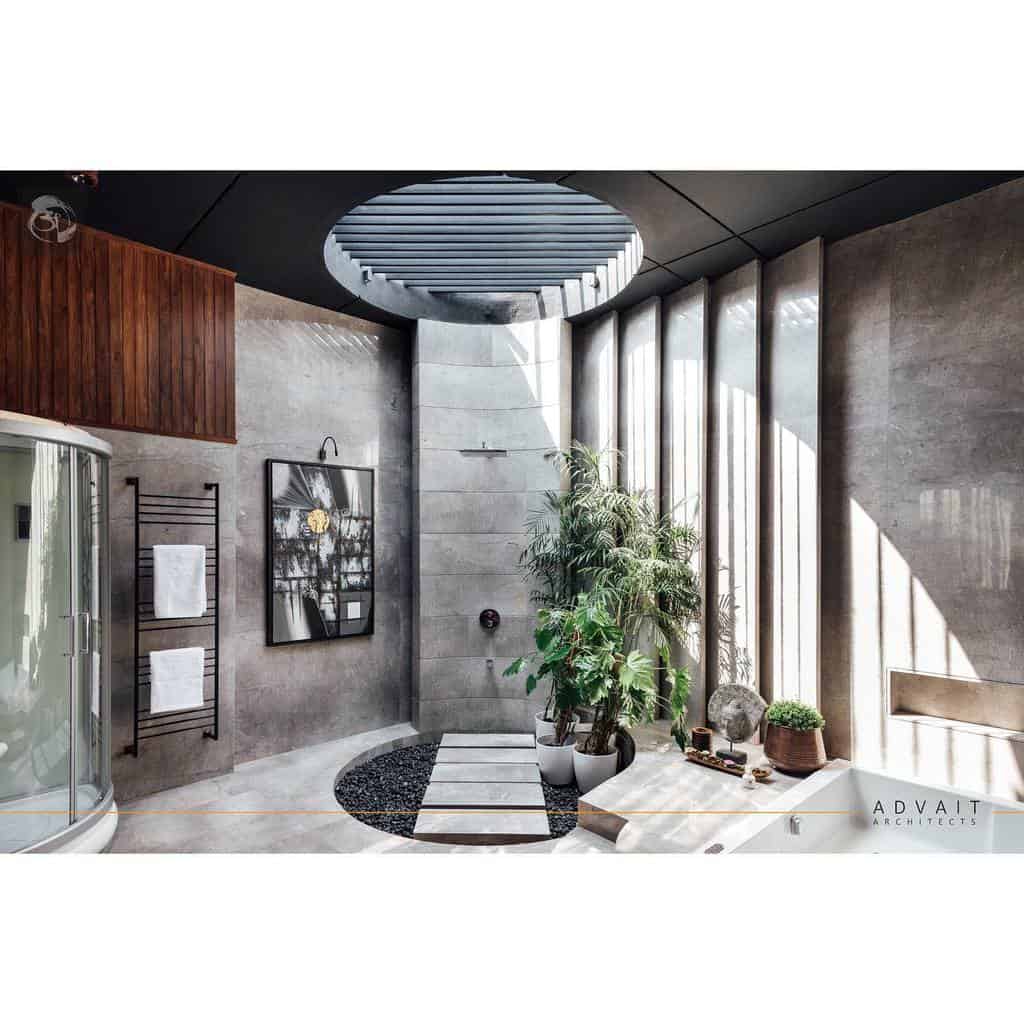
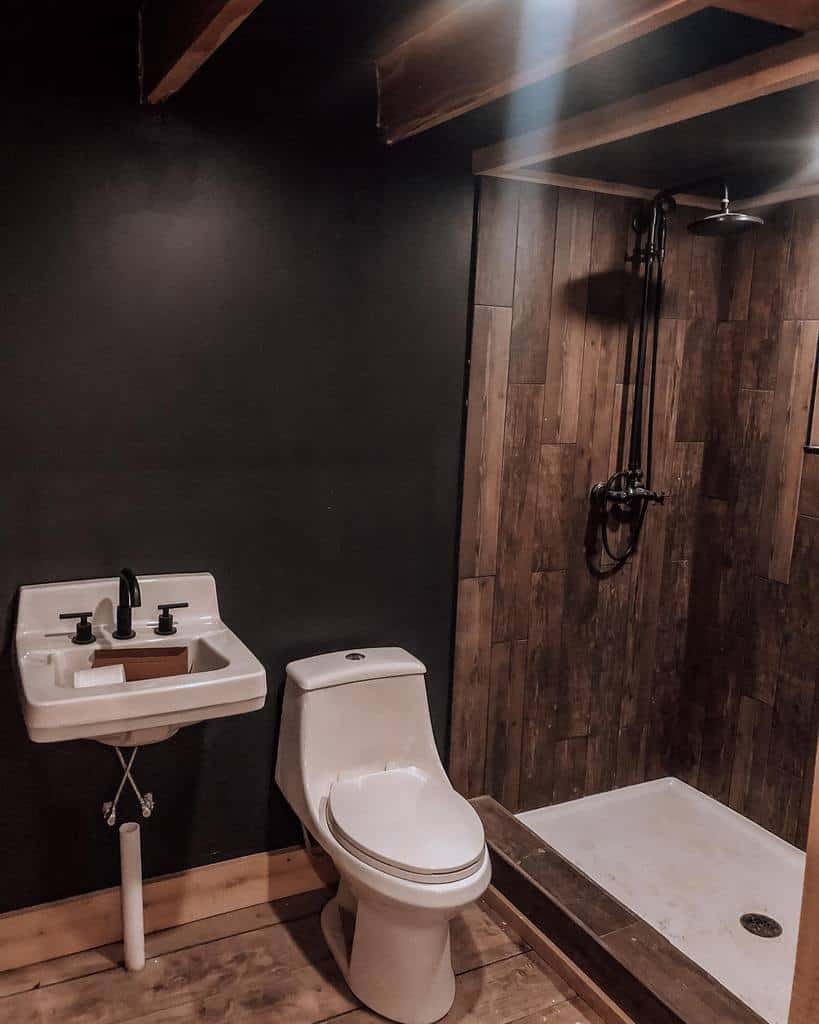
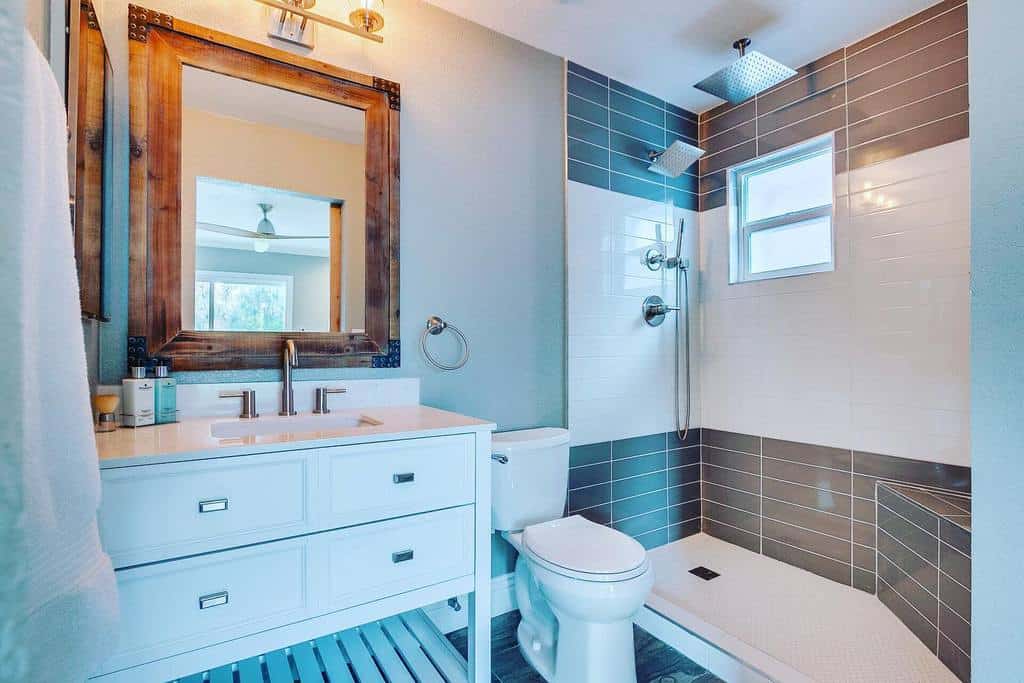
7. Modern Touches for a Fresh Look
Update your shower to look like a modern bathroom. Do more than just have a glass-enclosed curbless shower. Sink the floor and install a bamboo slat shower floor over it. This gives your bathroom a spa-like feel.


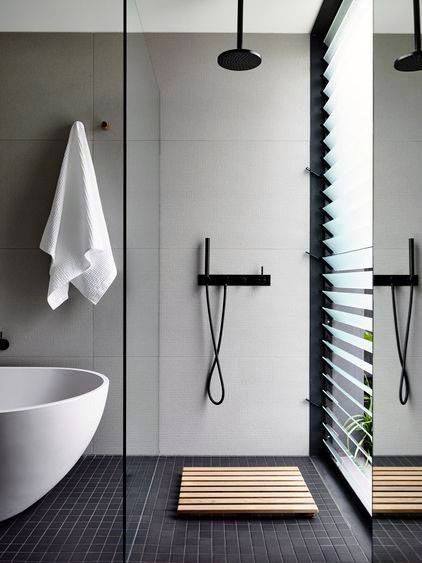
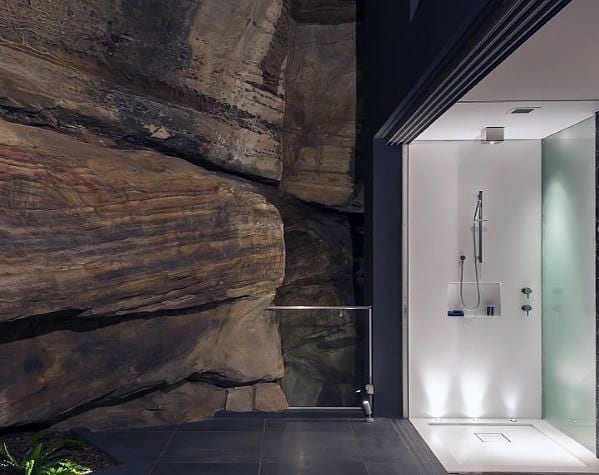
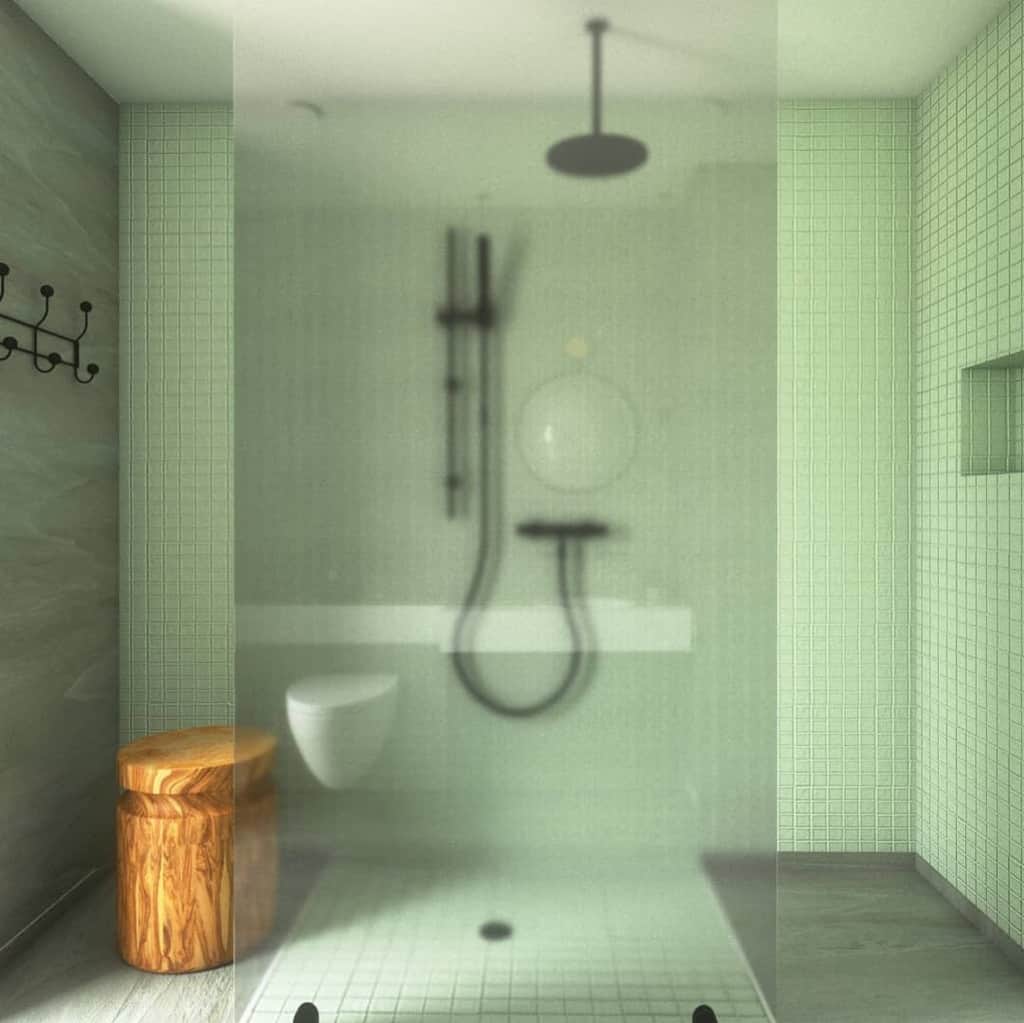
Add decorative accent lighting to your shower. You can install LED strip lights in the ceiling to glow downward. Or you can combine the glass with colored lights for a mood-influencing effect. Lights along the floor can make your shower safer to use at night when you’re tired and want to keep the lighting dim.
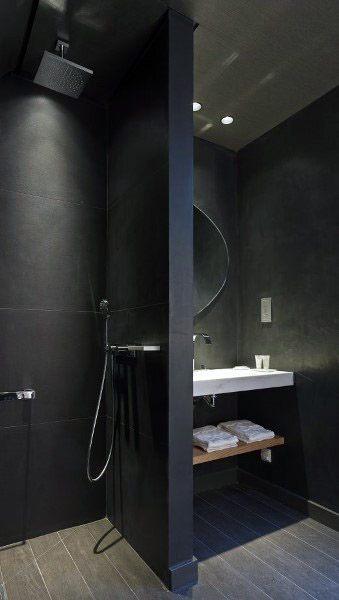
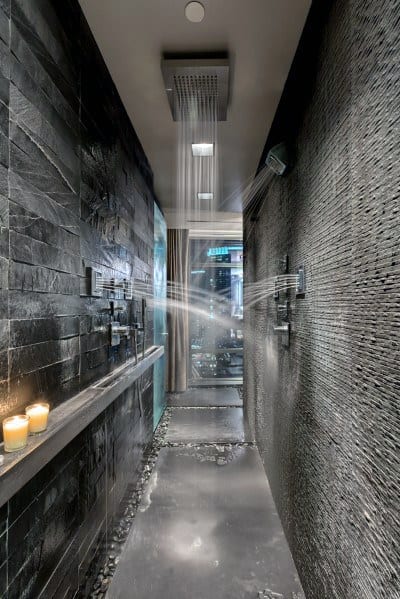
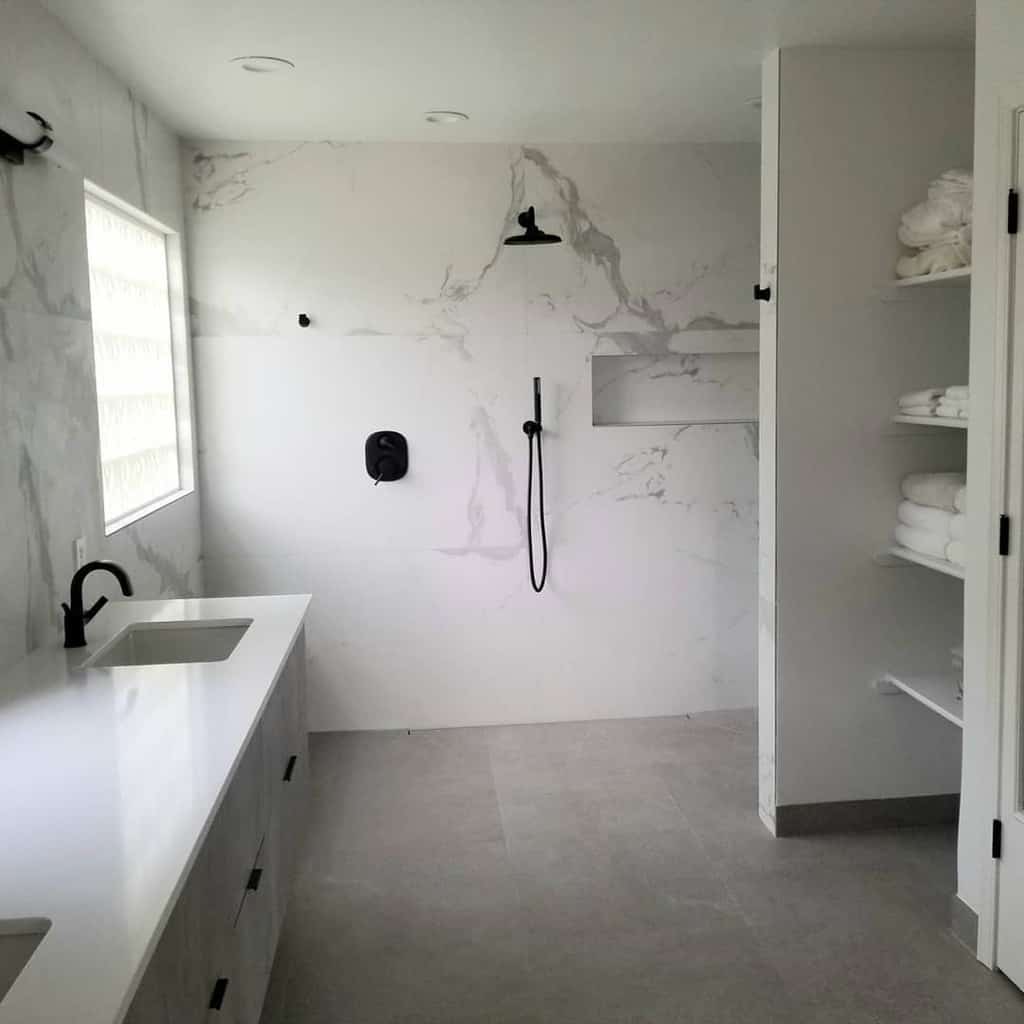
8. Explore Open Concept Shower Designs
Instead of having a separate shower space, you could embrace the open concept. The entire bathroom will have protective tiling. Then there’s a shower head in the corner with a slight slope in the floor towards a drain underneath.


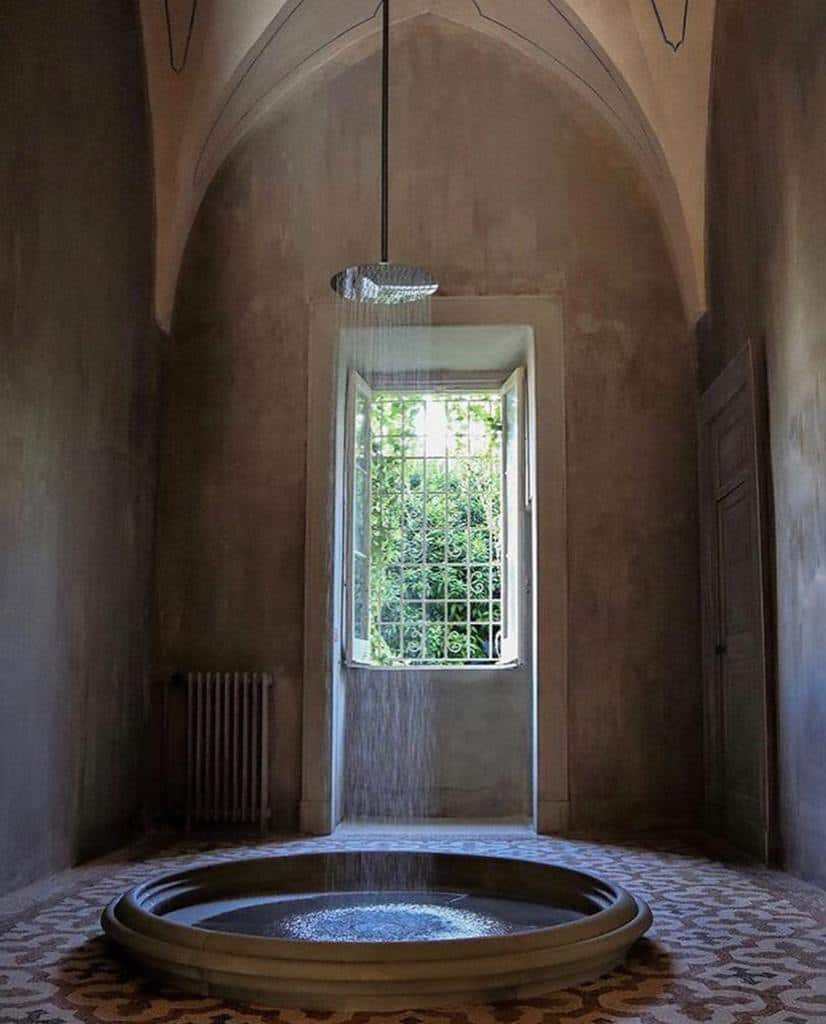
There are no doors, no walls, no dividers, or separators. This doorless shower design can look stunning and ultra-modern. However, keep in mind that now your whole bathroom becomes the shower, and water will get everywhere.
It also can feel cold and drafty while showering. It’s best to have a showerhead that’s angled to be directly overhead to rain down on you instead of coming out of the wall.
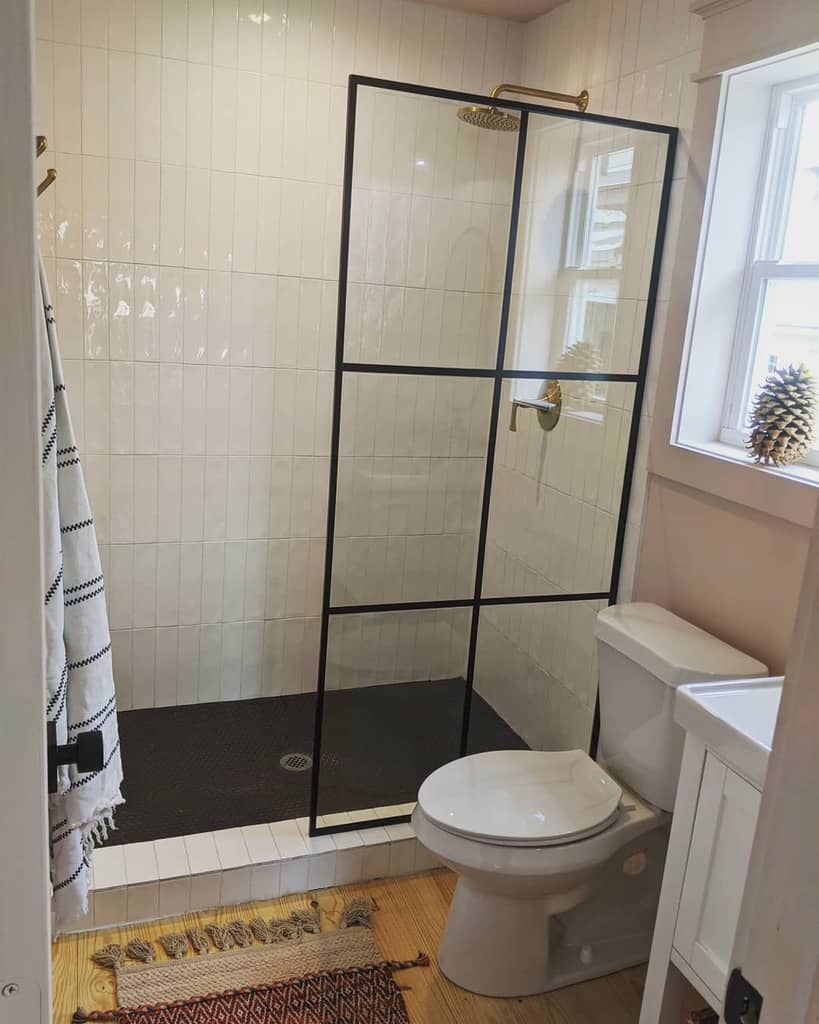
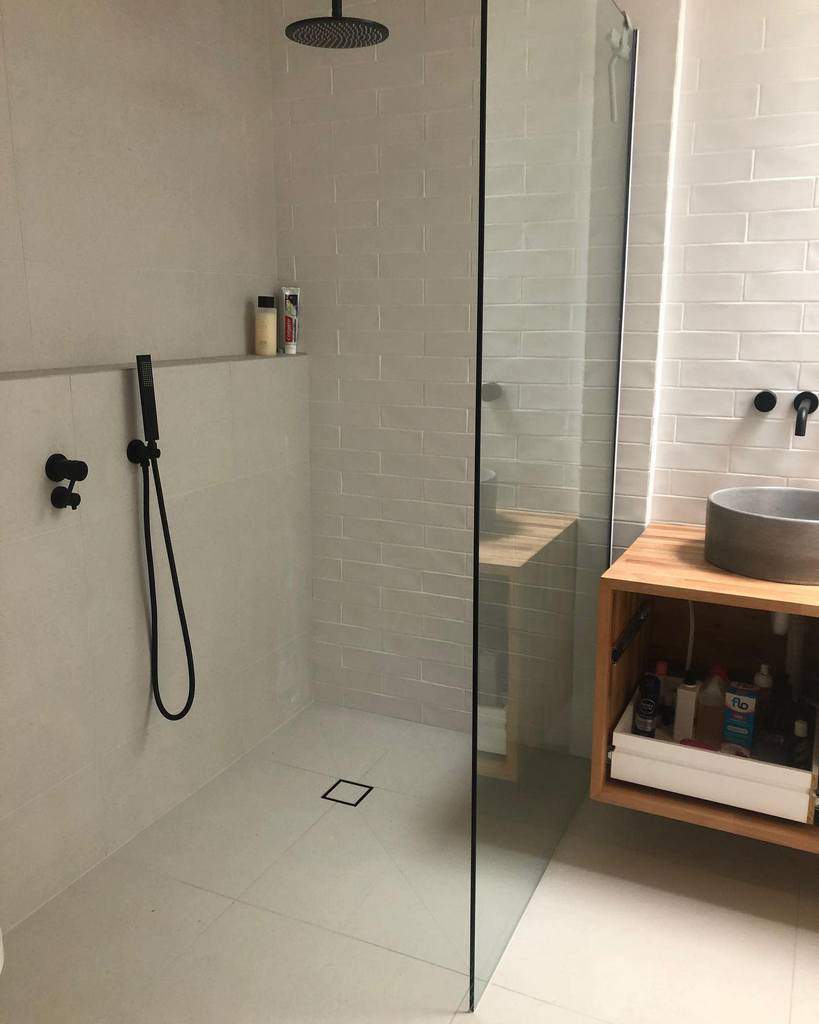
9. Simplicity in Shower Design
You don’t have to get overly creative or complicated with your doorless shower design. You can turn your traditional shower into a doorless one while keeping the same amount of shower space.
Start by taking out the tub and replacing it with a single shower pan to cover the floor. Then mount a single pane of glass that covers half of the opening.


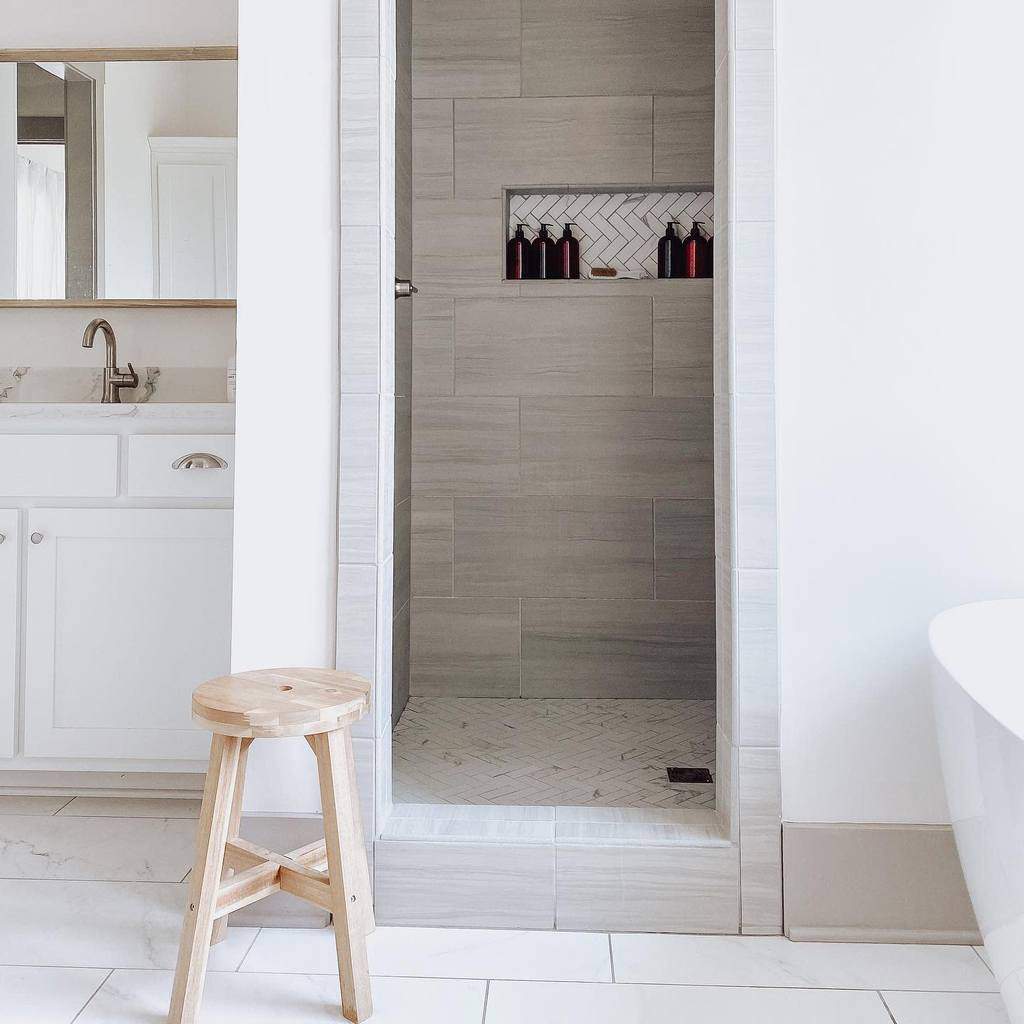
Keep the frameless glass clean and simple. This helps to keep your bathroom design feeling open. When you can see through the glass without anything blocking it, the whole bathroom will feel bigger.
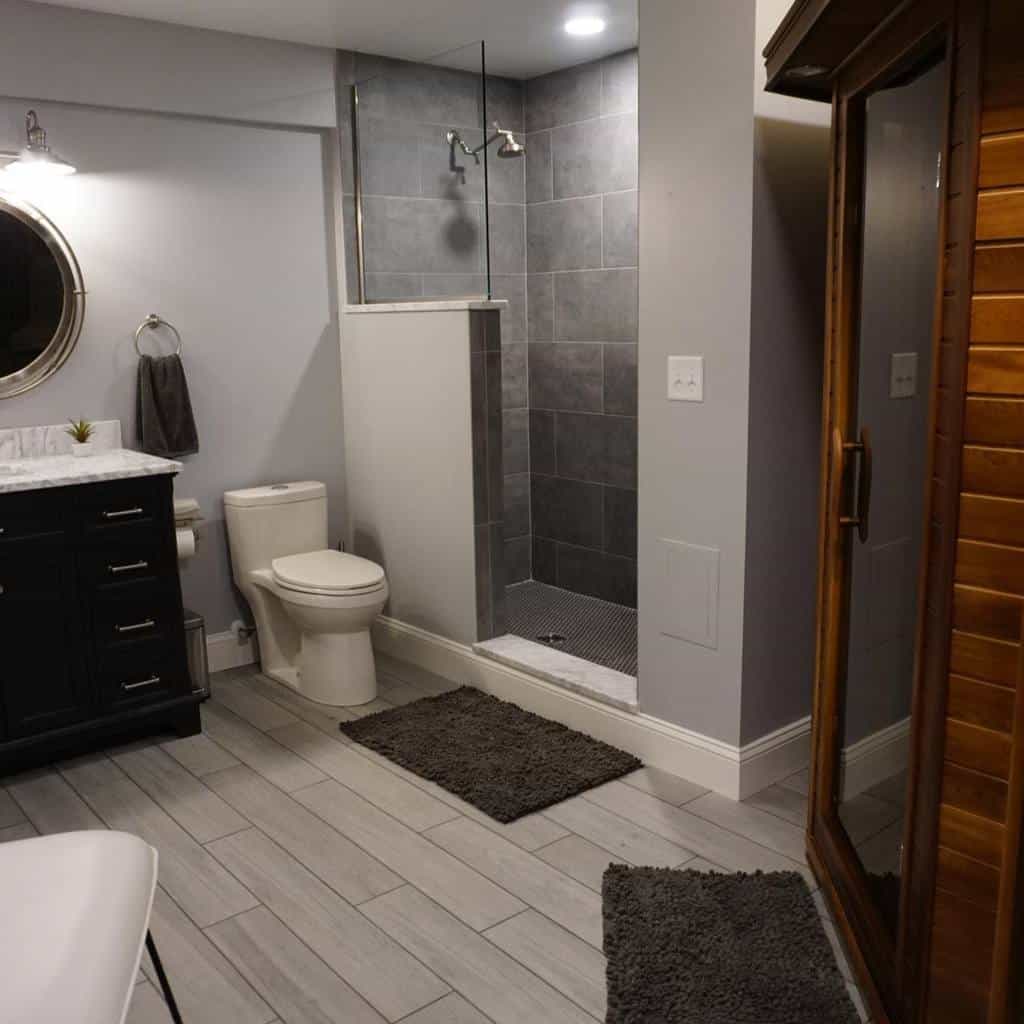
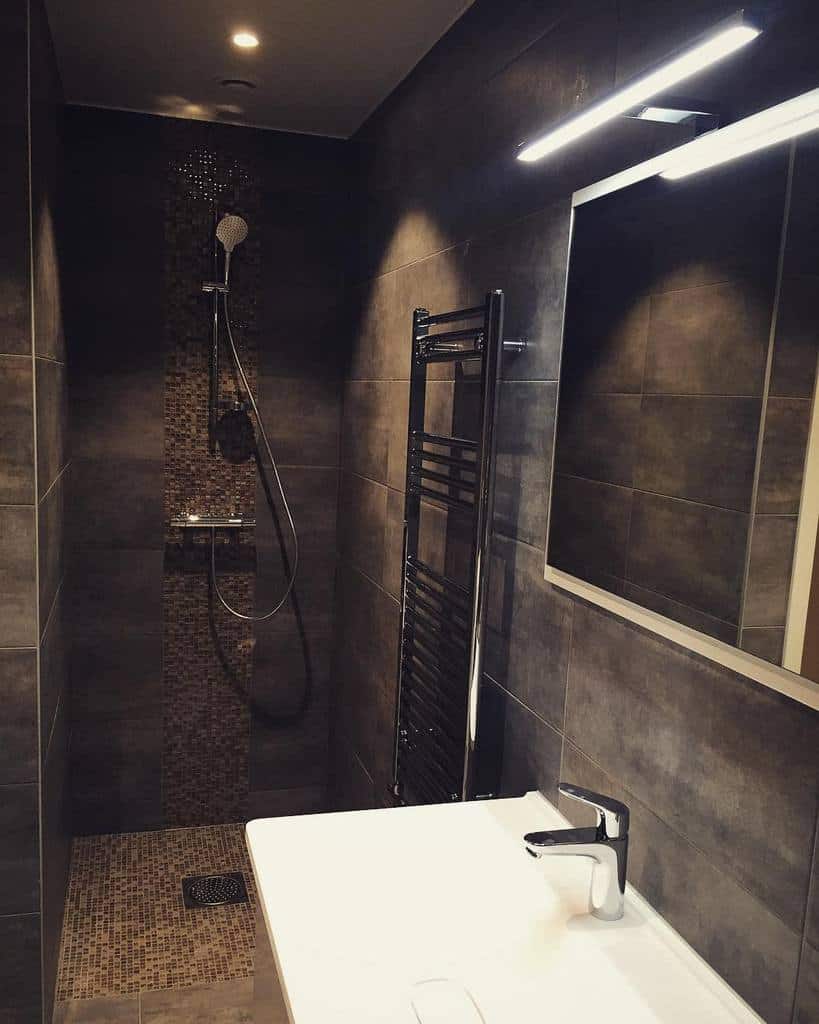
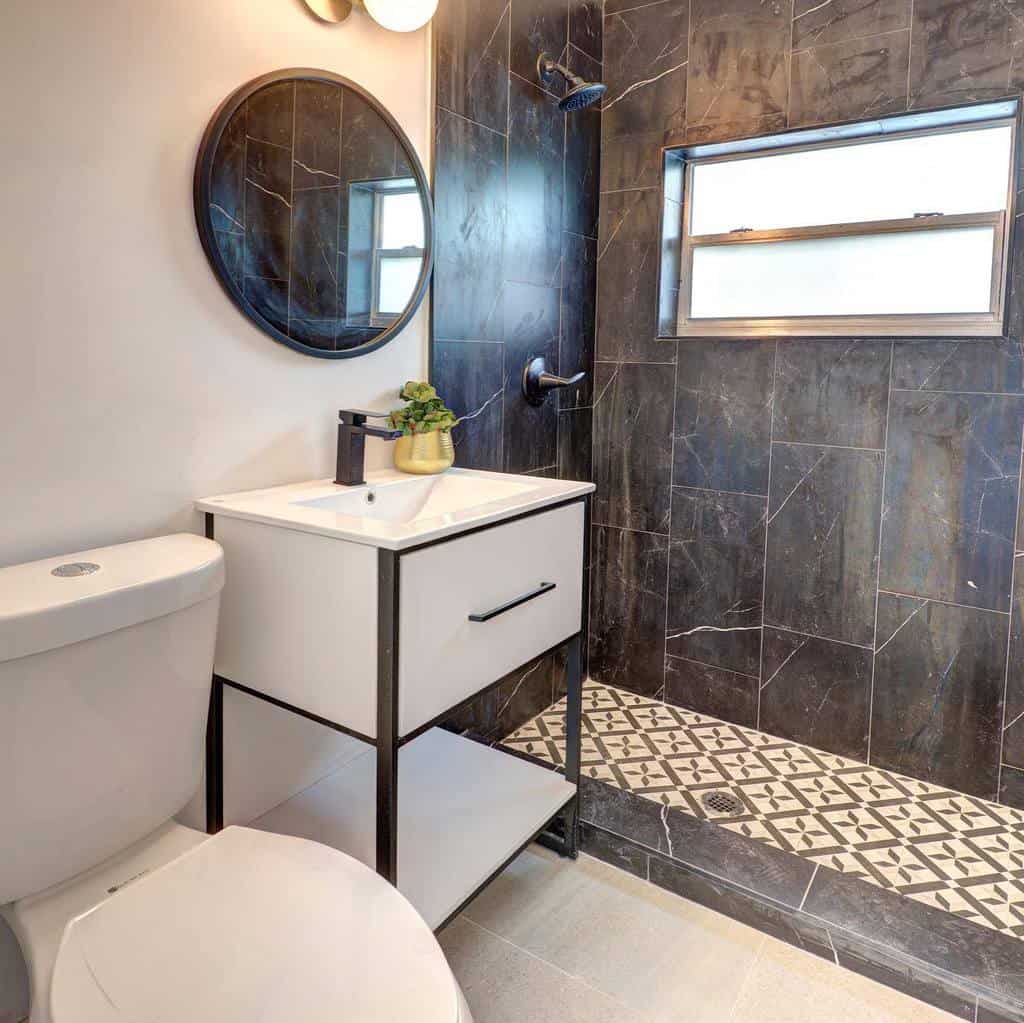
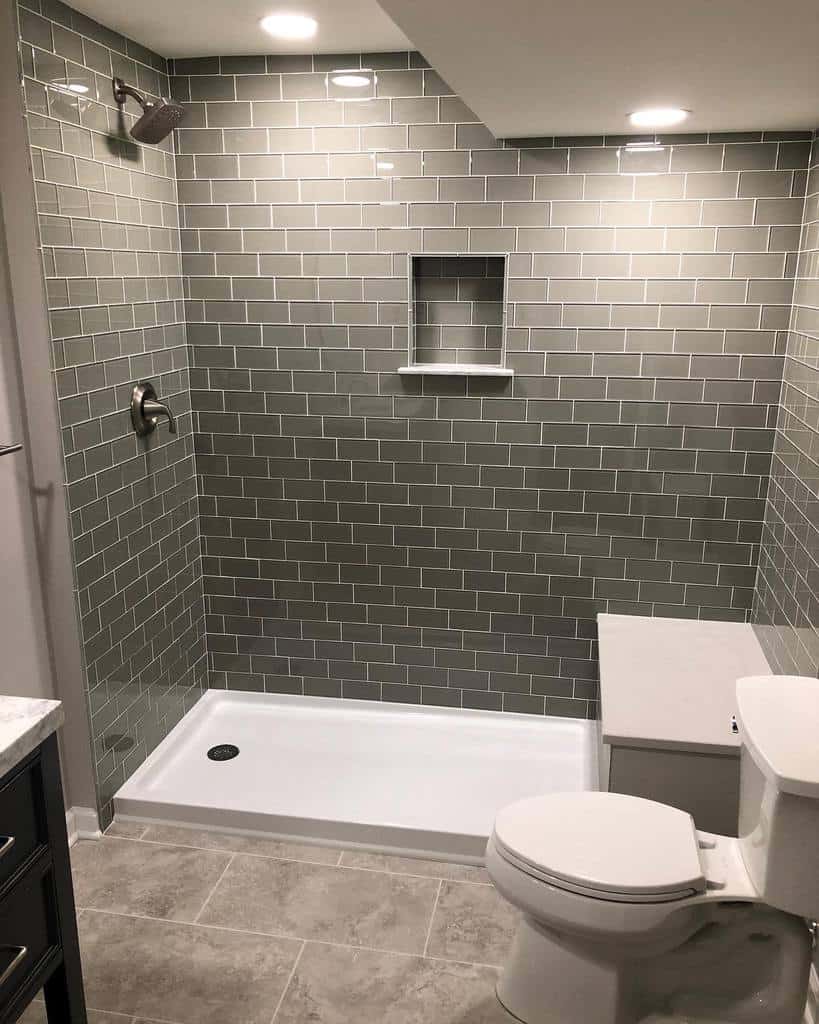
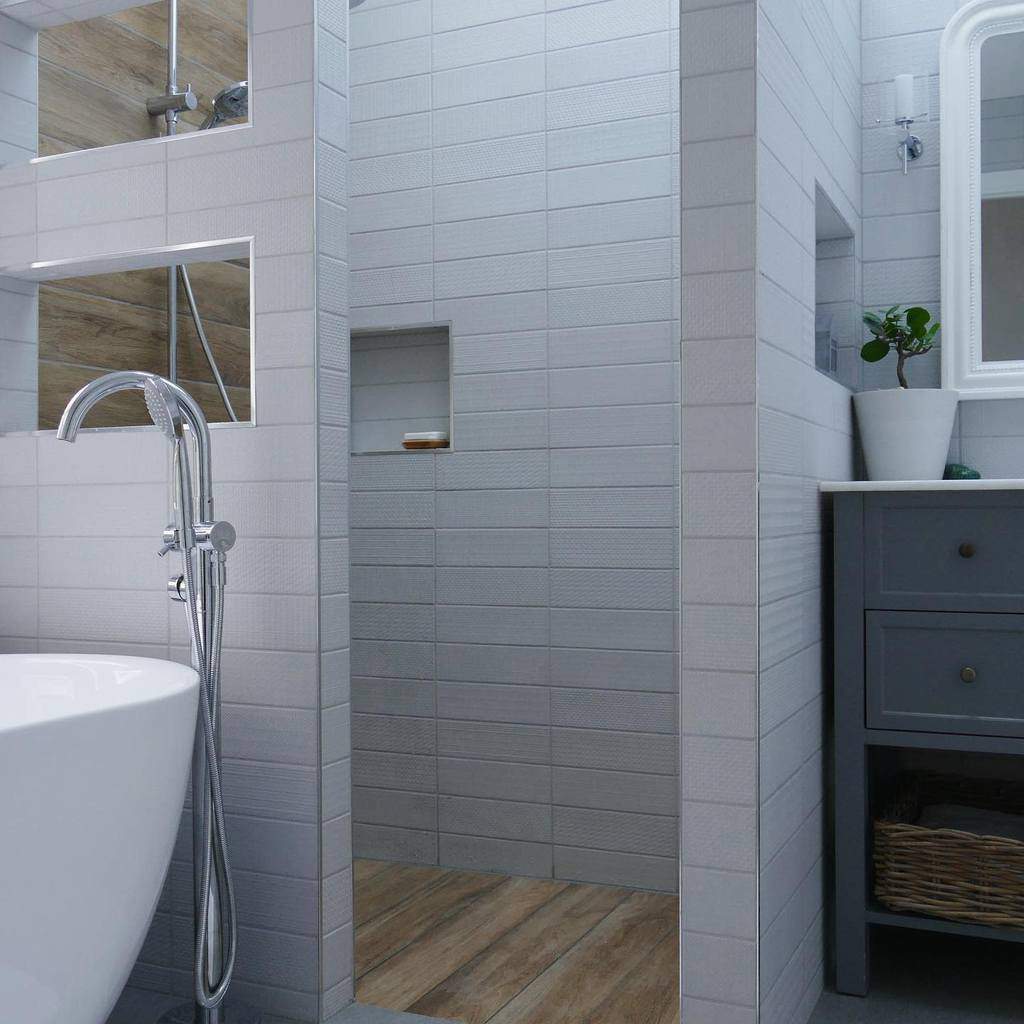
10. Smart Solutions for Small Showers
You can have a doorless shower in your small bathroom. The trick is to arrange the bathroom in such a way that the partition blocks splashing.
You can keep the small shower pan with a ledge on the outer side of the shower. This prevents water from flowing out of the shower and into the rest of the bathroom.


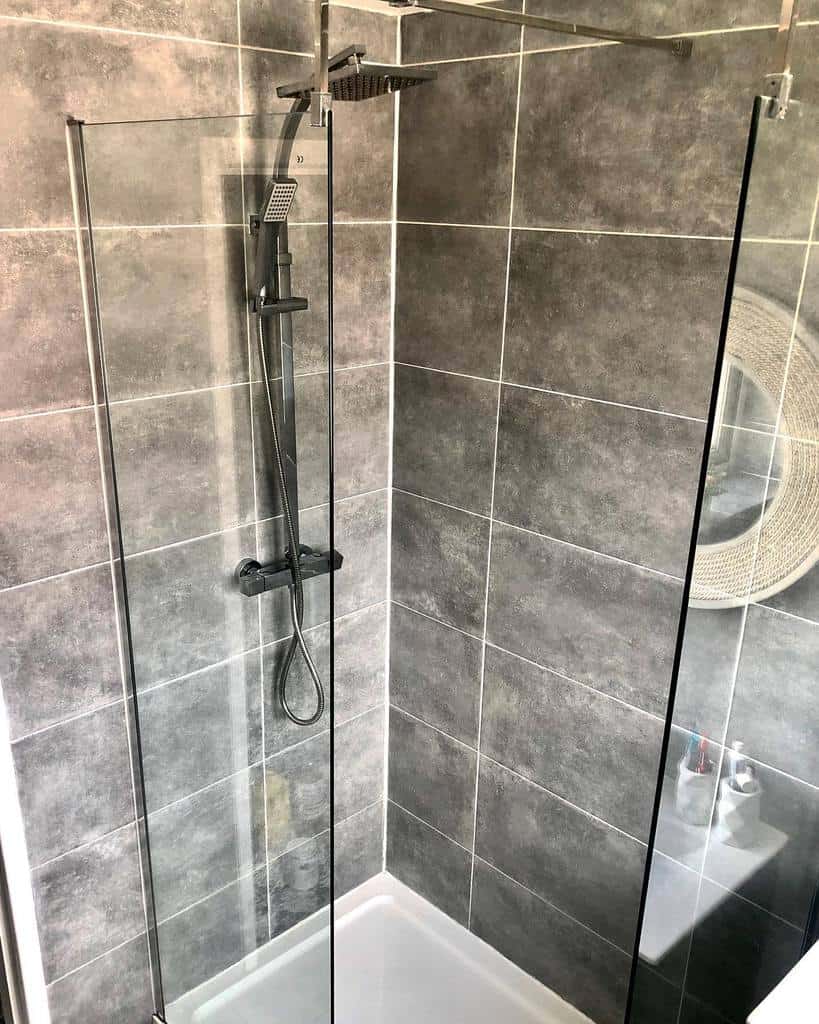
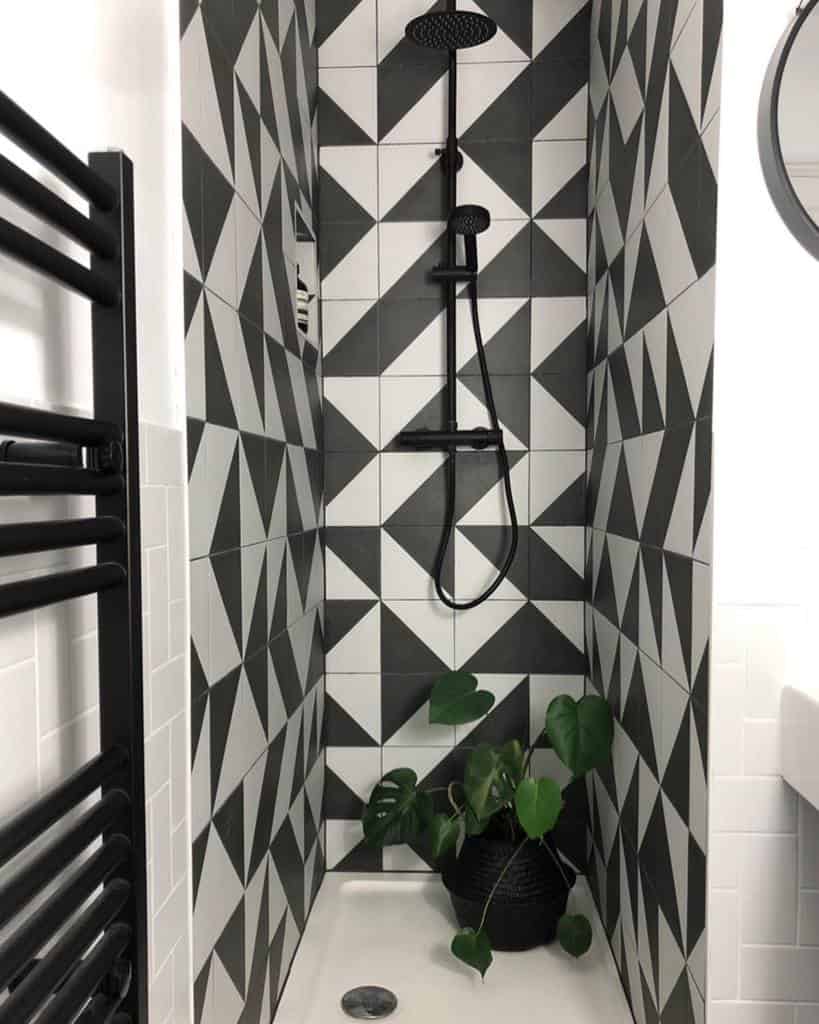
Don’t try to simply take off the glass shower door. Your shower was designed to work with the shower door in place. Instead, you can remove the door and walls and adjust them to have a partial partition to replace them.
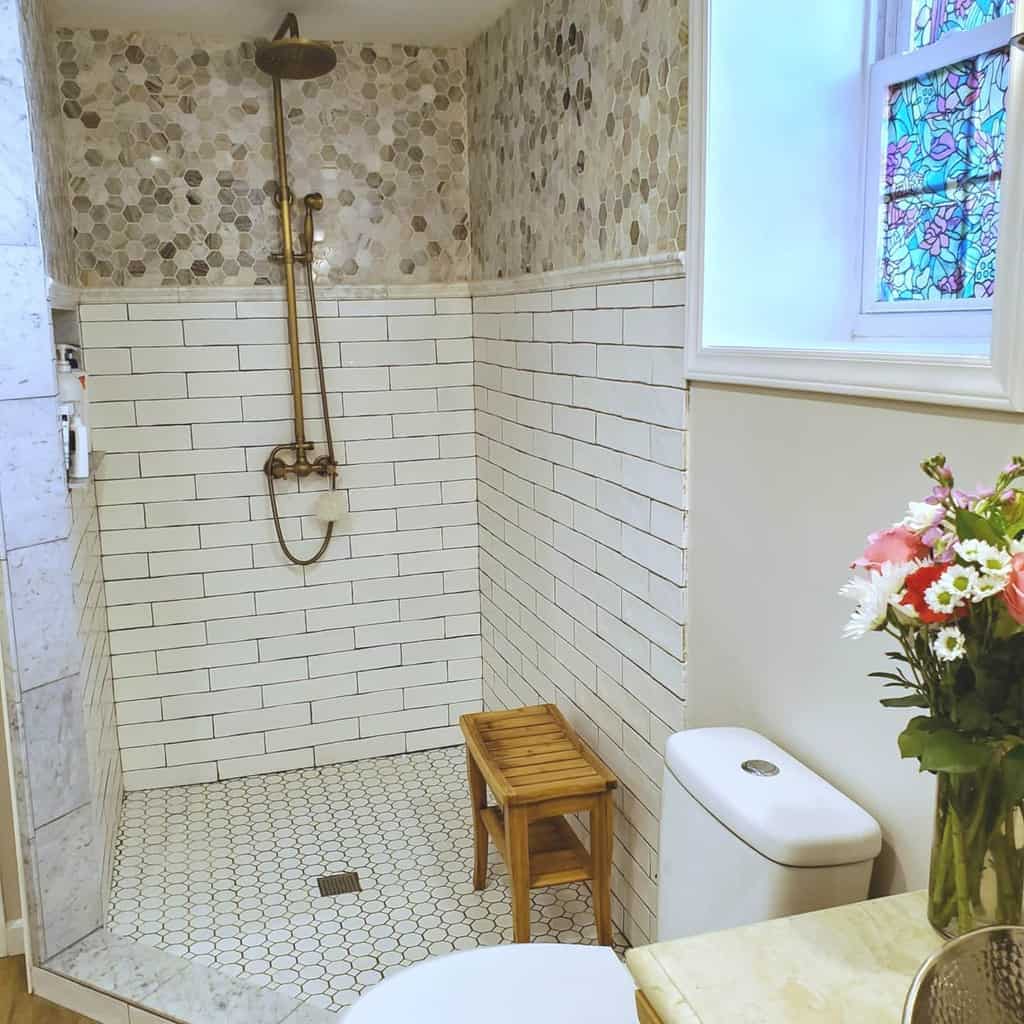
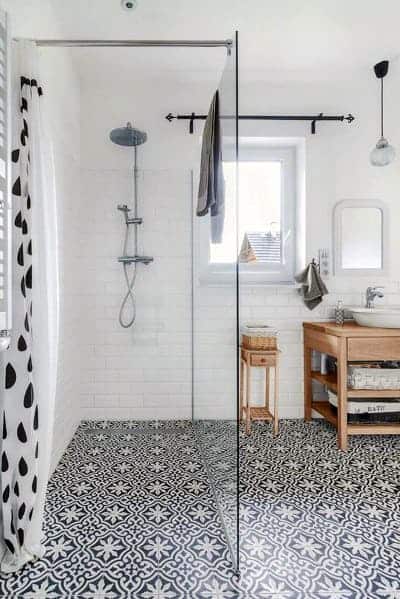
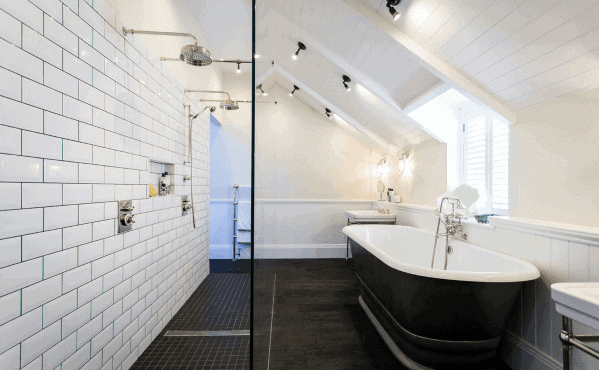
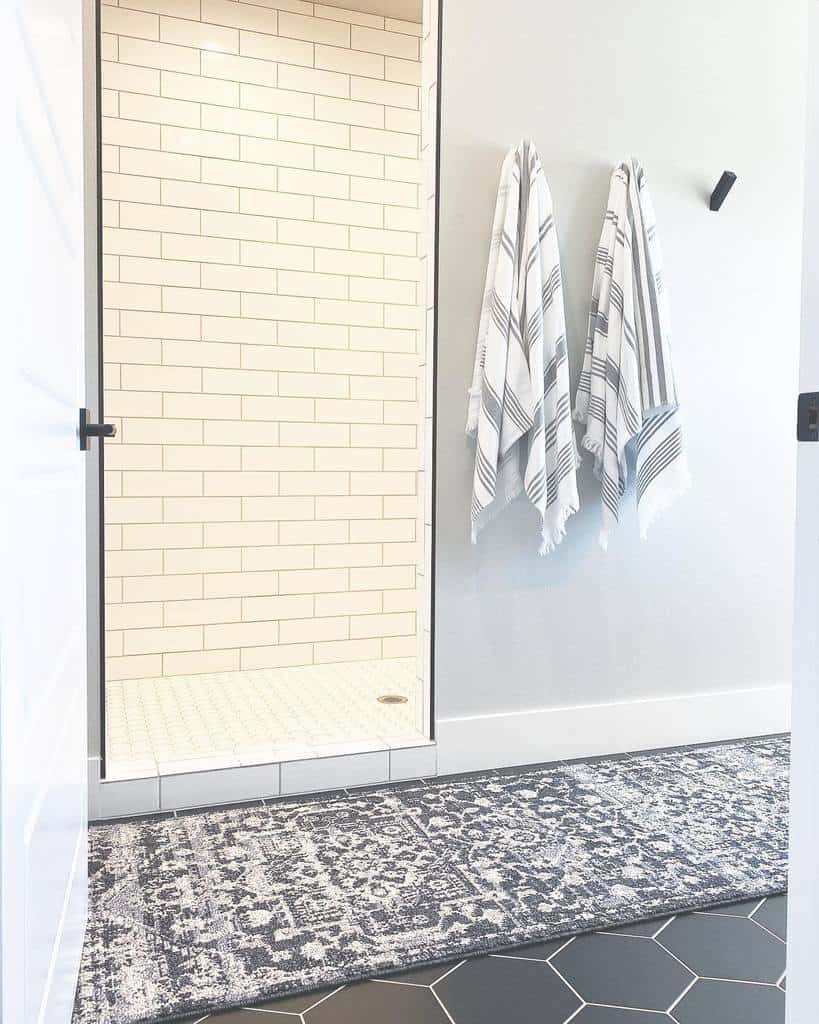
11. Classic Elegance with White Showers
White bathrooms will always be popular. The white tile gives the bathroom a clean feel, while the white tile keeps the bathroom feeling bright. You have several options when it comes to the type of tile you use.
For a luxurious aesthetic, you can use marble tile. For something affordable and universally appealing, you can use subway tile. Although, any kind of ceramic tile will be durable and is a smart choice for your bathroom.


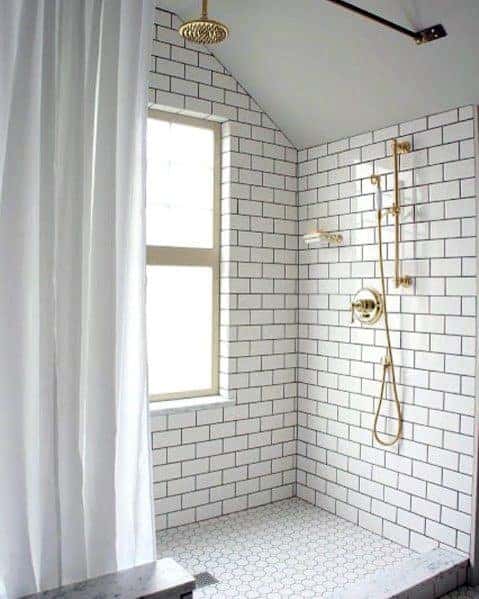
To keep your bathroom from looking like a hospital, try to mix the white tile with other colors and textures. This is why marble works so well. The marble’s main color is white, but it also has graining of other colors, such as grey, black, tan, or brown. This adds depth and texture to the room.
Doorless Walk-In Shower FAQs
At a minimum, your walk-in shower should be 42 inches by 60 inches. You need more space so that you can avoid accidentally splashing outside of the shower and into the rest of the bathroom. Most walk-in showers are a custom design, so they can be any size or shape that works with the space you have available in your bathroom.
You can use a shower curtain, tub shield, glass blocks, or a tiled wall. You could also skip having a wall completely and leave the entryway open. Not having any shower door makes cleaning your shower easier and faster.
Some people do complain that doorless showers are cold and drafty. This takes away some of the enjoyment of having this style of shower. However, others claim that this isn’t the case. It all comes down to how the shower is designed and whether or not airflow is directed into the shower.
10 Backyard Paver Ideas to Upgrade Your Patio
How do you convert your backyard into a stylish outdoor living area without losing its natural charm? Stone pavers can be wonderful alternatives to plain concrete slabs or messy rock mulch.
Backyard patio pavers are far from one size fits all. From flagstone to brick and everything in between, there are countless varieties of natural rock available to choose from for your own backyard projects. And that’s not to mention the many great manmade paver materials on the market!
Keep reading for the top backyard paver ideas to inspire your future patio design or garden walkway.
1. Flagstone Pavers
Flagstone is a great option when it comes to backyard pavers. Not only are they visually stunning, but they are strong, durable, and can withstand harsh weather. Their natural beauty and texture add depth and character to any backyard design.
Flagstones come in a wide range of sizes and variations, allowing you to create a personalized pattern that will fit your outdoor space perfectly. These pavers are also low maintenance, ensuring that you spend less time caring for your backyard and more time enjoying it!


2. Bluestone Pavers
Bluestone is a durable material, able to withstand harsh weather conditions and heavy foot traffic. The natural hues of blue, gray, and green blend together to create a unique and eye-catching look that will elevate your backyard to the next level. With bluestone pavers, you can create a patio, walkway, or other outdoor feature that is both functional and aesthetically pleasing.


3. Cobblestone Pavers
If you’re looking for a way to add some rustic charm to your backyard, cobblestone pavers may be just the ticket. These natural stone pavers have been used for centuries in Europe and are becoming increasingly popular in the United States.
They are durable and can withstand heavy foot traffic. Whether you’re creating a pathway or a patio, cobblestone pavers will create a warm and inviting atmosphere.


4. Limestone Pavers
Limestone is a sedimentary rock that has been used for centuries in architecture and construction. It is known for its earthy tones and subtle texture, which add character and charm to any outdoor space.
Limestone backyard pavers are a popular choice for their low maintenance, slip-resistant, and weather-resistant properties. The subtle natural variations in each piece create a unique and organic look that is both elegant and sophisticated.


5. Slate Pavers
If you’re searching for a long-lasting and stylish flooring solution for your backyard, slate pavers may be just the thing. The naturally occurring rock is renowned for its distinctive color variations, and its durability makes it a top choice for outdoor spaces.
The wide array of textures available – from honed to cleft – affords flexibility in design, and slate’s impermeability renders it resistant to stains and weather damage.


6. Interlocking Pavers
These versatile and durable pavers come in a variety of colors and textures, allowing you to customize your patio or walkway to suit your personal style.
Interlocking pavers provide a safe and slip-resistant surface for guests to walk on. The interlocking design of these pavers ensures that they stay securely in place, even in harsh weather conditions.


7. Concrete Pavers
With a wide range of textures, colors, and patterns available, you can create a unique and customized look with concrete pavers that perfectly complements your landscape. They are incredibly durable and long-lasting.


8. Round Pavers
Rather than the traditional square or rectangle shapes, the circular pavers offer a fun and intricate design that catches the eye.
By strategically placing the pavers and utilizing a variety of sizes and colors, you can create a truly one-of-a-kind backyard that reflects your personal style.


9. Pebble Paver
Pebble pavers add a natural and rustic touch to any backyard while offering a practical solution for creating a convenient and beautiful outdoor living area.
Pebbles come in various sizes and colors, allowing you to create a unique and personalized design for your backyard. Whether you prefer a gravel pathway or a full pebble patio, these backyard pavers will create a beautiful and functional space that you can enjoy all year round.

10. Travertine Pavers
Travertine backyard pavers are are a form of limestone and are available in a range of colors from ivory to red. Travertine pavers are durable and can withstand harsh weather conditions, making them a popular choice for poolside flooring.
Paired with the right landscaping, these pavers can add a touch of elegance and sophistication to your backyard pool. Plus, their non-slip surface makes them safe to walk on.


Backyard Paver FAQs
While it’s possible to grout pavers like you would bathroom tiles or a backsplash, most homeowners fill the gaps in their patio with sand. Coarse sand locks the pavers in place and creates a finished look that lasts for years.
Polymeric sand is a more permanent solution. It is made of regular sand and a water-activated bonding agent. Once activated, the polymeric sand hardens for a stronger, erosion-resistant bond.
Landscape fabric is effective underneath large areas of exposed pea gravel or rock mulch. When it comes to installing paver stones, however, landscaping fabric is often more trouble than it’s worth. It can interfere with proper drainage and is hard to remove once it starts to break down.
Permeable pavers allow water to seep through to the soil below. This is a crucial part of any healthy ecosystem.
Some pavers are made from porous materials that allow water to pass through the pavers themselves. But most permeable paver patio designs incorporate gaps between the stones that let rainwater flow through and prevent damaging washouts.
10 Amazing Indoor Herb Garden Ideas
“Fresh herbs really belong anywhere you put them.”- Alex Guarnaschelli
Whether you’re a beginner learning how to boil water or prepare eggs or an expert with many recipes under your belt, fresh herbs will make your cooking better. There’s no denying that fresh herbs give your food an intense flavor that blooms in the food for an explosive medley in your mouth.
Growing herbs indoors is the easiest way to start incorporating fresh herbs into your cooking. You just need to figure out the best way to grow those herbs in your kitchen. These indoor herb garden ideas will help you take your dishes to the next level.
1. Simple and Budget-Friendly DIY Herb Garden
You don’t have to spend a lot of money or build an elaborate setup to have fresh herbs growing in your kitchen. All you need to do is create a simple DIY herb garden. You could use some old glass jars and fill them with dirt and add your herbs. You could use jars of different sizes to match plants that may vary in size. For a uniform look, you could collect your jars over time so they all match.


Another option is to save several cans and use them as your planters. If you have more coffee mugs than you know what to do with, why not use them for your herbs?
Whatever you decide to use, consider labeling your herbs. You should also consider decorating your DIY planters to mask their original purpose and turn them into decor. You could wrap them in fabric, paint them, or slide a fancy sock over each one. Use fancy sticker labels that you write each herb’s name on and then stick to your planter. Or buy small plant stakes that you can write the herb’s name on and stick in the soil.
2. Creative Hanging Herb Garden for Small Spaces
If you don’t have a lot of counter or wall space, you’ll have fewer options in where you can set your plants down, so it’s time to get creative. A hanging herb garden eliminates the need for a flat surface. You can put your herb planter anywhere as long as there’s a ceiling.


Why not have flavorful herbs within arm’s reach by hanging a planter next to your stove or workspace? You could have a solid board with notches that you hook your pots onto. They stay in place by counterbalancing against the board. Or you could have multiple baskets that connect by chains or rope.
If you have empty wall space, you could mount several bars or a rack. Then hang individual pots from it. Try to match the style and materials to the rest of your kitchen’s style and decor.
3. Innovative Hydroponics and Aquaponics for Herb Gardening
Not all plants need potting soil to grow. If you aren’t crazy about the idea of having dirt in your kitchen, why not try hydroponics? There are several kits that will make it easy to start growing your own herbs in water. However, this isn’t your only option.


You can easily build your own hydroponic DIY indoor herb garden. You’ll create a mason jar herb garden where the jars are full of water, with small baskets in the top that hold the plants. Skip the herb seeds for this one. This growing method is best for clippings or when you’re growing from the stalk of an old plant, such as chives.
There are some things to watch out for with your water garden. You want the roots to grow into the water, but you’ll need to watch for root rot. This is when the roots see too much water. Another problem is when you don’t maintain the right water level, and the plant dries out. Algae is another common problem that develops with this type of gardening. It occurs when your water sits stagnant for long periods of time.
4. Kitchen Herb Garden as Decorative Accents
Your indoor garden can be more than just a place to grow perennial herbs. You can turn it into the decor. The natural greenery will enhance the look of your kitchen and give it a natural warmth. Look for a place that you can arrange your herb garden to create a decorative accent while also being a good spot for your plants to grow.


Choose a planter that will complement the rest of your kitchen design. A rustic kitchen could have a vintage tin planter. A farmhouse kitchen would look cute with a shallow basket holding a few porcelain or ceramic jars.
For those with a modern kitchen, you could choose a sleek glass or black planter with a square shape and crisp corners. Earthy or bohemian kitchens will look right at home with terra cotta pots. The idea is to create a garden that’s both decorative and functional for growing herbs.
5. High-Tech Modern Herb Planter for the Tech-Savvy Gardener
If you love technology and innovation, consider buying a modern herb planter. These are more than just pots. They are a complete growing system. What makes them stand out is that many come with a grow light. This lets you enjoy the hobby of indoor gardening, no matter what kind of light your kitchen has.


Look for herb garden ideas that will work with the design of your kitchen. You could have a small modern planter that sits on the counter and grows a handful of small herbs. Or you could have a full-sized planter that sits on the floor and grows many herbs and plants.
There are other modern planters that take the guide work out of caring for your herbs. They have a double-walled design that suspends the plant above the water level. Then if you over water the plant, you won’t drown it. If you forget to water it for a while, the plants can still reach the reservoir and pull from the excess water.
6. Diverse Planter Ideas for Unique Herb Gardens
Your options are limitless when it comes to creating your kitchen garden. Sure, you could have your standard windowsill planter where you plant herbs in several small pots and line them up on a shelf. Or you could have a single trough-style planter that you place several herbs inside of.


If you’re handy, you could build your own planter to fit the exact size of the space you have available. Use some spare wood you have lying around and attach a few pressure clamps. Then you can adjust their size to hold a pot suspended in place.
Another cute idea is finding a vintage milk bottle carrier to place mason or other glass jars inside. You can then move the carrier about with the handle. This makes it easy to move your herbs about the kitchen or house to get the ideal amount of light.
Look for ways you can customize your garden. Maybe there’s a sign on it with your name or an inspirational saying that speaks to you. Don’t forget to add the herb labels as the finishing touch.
7. Create a Thriving Herb Oasis in Containers
If you decide to put your herbs in pots, make sure you set them up for success by planting them correctly. You’ll want to use the right type of soil or potting mix. Not all herbs enjoy rich dirt. Some prefer a more arid and sandy composition.


You’ll also want to have proper drainage for your herb plants. You can achieve this with a hole in the bottom of the pot. If this isn’t possible, create a layer of rocks on the bottom. This will create drainage space under the soil for the water to drain away from the roots. However, it doesn’t completely remove the water, so if you forget to water your herbs, the roots can still reach the excess moisture.
Place your potted herbs in an area where they will get as much natural light as possible. This will help them to grow with plenty of leaves.
8. Maximizing Space with Vertical Herb Garden Designs
The beauty of herbs is they don’t need a lot of space. These aren’t like the plants outside in your landscaping or garden; you only need small herb plants to have plenty of fresh seasoning for your cooking. If you lack square footage, then the only solution is to create a vertical garden.


These indoor gardens use the often unused vertical space in your kitchen to grow your plants. You could put this garden idea to practice in your kitchen by hanging a vertical planter on your wall. If you don’t have the wall space, there are tower planters that can hold multiple herb plants on various levels.
To make your vertical planter a success, place the plants that like drier soil on the top and plants that prefer more water on the bottom. Then place the plants that enjoy the sunlight towards the light and those who prefer indirect light on the other side.
9. Wall-Mounted Herb Garden for a Modern Twist
The traditional method for growing herbs and other plants is in pots or planters. However, herb pots aren’t your only option. Instead, you could grow your favorite herbs in a wall hanging. Some planters have multiple spaces for growing several herbs. They are sometimes made from cloth or fabric but can also be wood or plastic.


Mount the wall hanging planter on a blank space on your wall. Then dedicate each compartment to an herb plant. You could have parsley, lemon balm, and basil, to name a few. This keeps all of your plants contained in one easily maintained planter. The separate compartments also ensure that one plant doesn’t infringe on any of the others.
Another option for your wall hanging is to mount bars on your wall. They might look similar to a towel rod. Then hang small pots on hooks from the bar. Ikea has kitchen organizational kits that make this idea easy to implement in your kitchen.
10. Grow a Windowsill Herb Garden
Just like all other plants, your herbs will enjoy the sunshine. If you want your indoor plants to flourish, consider building a windowsill herb garden. The easiest way to do this is by building a single trough for planting different herbs in. This gives you one pot to maintain and water. The downside of this garden is that you risk one plant taking water and nutrients from another.


Your other option is to build a shelf on which you can place several pots. This gives you the freedom to move the plants around as needed to find the perfect growing spot for each one. You can also easily bring the pot with the herb you want to cook with over to your workspace. This eliminates making several trips back and forth as you’re cooking.
If your kitchen faces the wrong direction, your window may not get enough light. You could compromise by putting your herb garden in a different windowsill that does get the right amount of light.
Indoor Herb Garden FAQs
The best herbs to grow indoors are basil, oregano, parsley, and rosemary. These are perennial herbs that you can get from your local hardware store or garden center. You could even grow many of them from a clipping taken from a more mature plant.
You can grow sage, thyme, rosemary, marjoram, and oregano together. This makes sense since they are all Mediterranean herbs that you see used together when cooking. Basil and parsley grow well together because they prefer similar growing conditions. Mint should always be by itself.
The most important things to consider are proper watering and sunlight. Create adequate drainage so that the roots don’t rot. Then water them just enough to make them happy. Place the herbs in an area of your kitchen that gets plenty of natural sunlight. Then, learn how to harvest your herbs correctly so that you don’t damage the plant when taking your clippings.
10 Backyard Playground Ideas
“You could hear the wind in the leaves, and on that wind traveled the screams of the kids on the playground in the distance, the little kids figuring out how to be alive, how to navigate a world that was not built for them by navigating a playground that was.” – John Green
Outdoor play is a vital part of the childhood experience and what better place to experience it than in your own backyard?
Children who spend ample time playing outdoors gain multiple physical, social, emotional, and intellectual benefits. Therefore, if you have a private backyard of any size, designing a fun backyard playground is a must.
Scroll through our gallery to see dozens of fun DIY backyard playground ideas suitable for kids of all ages. Whether you start with a premade playset or design a DIY backyard play area from scratch, you’ll be on your way to having the best kid-friendly yard on the block.
1. Swing Sets for Timeless Fun
Swing sets offer a blend of fun and physical activity. Incorporating them into your backyard can create a focal point for children’s play.
Choose from wooden or metal sets to match your backyard’s aesthetic and consider adding features like tire swings for added fun.


2. Creative and Cozy Playhouses
If given a choice, many a kid would rather have a playhouse than a swing set. A playhouse is a mini-retreat for an imaginative child; a perfect place for reading books alone or hosting tea parties with friends.
A playhouse can also be integrated into a play structure, either at ground level or elevated with a sandbox tucked beneath. Backyard ideas for play house design can mimic the exterior of your main home.
Or you can go another direction entirely. Design a charming cottage for a creative little girl, or make a small red barn—a perfect touch behind a farmhouse.


A tree house is another great type of backyard playground shelter. Watch this video for tips on locating the perfect tree to hold your treehouse:
3. DIY Playset Projects on a Budget
Building a playset yourself can be cost-effective and customizable. Use materials like repurposed wood or recycled tires, and design it to fit your space and children’s interests.
Sturdy plastic slides, rock wall footholds, and other features are usually structurally sound well after wooden playset parts have worn out.
Browse social media marketplaces for PVC pipe and other material that can safely be repurposed into a swing set frame or teepee poles.
Hang a tire swing from a sturdy tree for an easy, affordable DIY swing. If you have a friend whose kid has outgrown their outdoor playset, ask if you can disassemble it and reuse some of the parts.
Adding personal touches like themed paint jobs can make it unique.


4. Dynamic and Versatile Playsets
Invest in playsets that grow with your child. Look for modular designs that allow for additions like climbing walls or rope ladders.
These adaptable structures can evolve over time to keep up with your child’s developing skills and interests.


5. Building Sandbox Playgrounds
A sandbox is the stuff kid dreams are made of. Who doesn’t have happy memories of digging for hours, creating roads, tunnels, and construction sites? While many playset kits come with an integrated sandbox, it’s easy and inexpensive to build your own.
Note that a sturdy lid is a must for any backyard playground sandbox. It will keep cats and wild animals from urinating or defecating into the sand between play sessions. It will also help keep the sand and outdoor play toys clean.


6. Exciting Backyard Slides
I’m sure your child would agree: a backyard swing set isn’t complete without a fun slide or two. A slide is a great addition to any playset as it encourages climbing. Getting to the top and repeating it helps build physical coordination—an important benefit of backyard play.
Playset slides come in many configurations. Get a short toddler slide if your children are very young.
Tall slides can be a climbing hazard for very small children, but tall, twisting, tunnel slides are ideal for big kids. Make sure you have a soft pad of artificial grass or a thick layer of wood chips beneath for a soft landing.


7. Modern Saucer Swings
Saucer swings are another vital feature when shopping for a playset or designing a DIY swing set. For safety reasons, look for swing set chains that are adjustable for height. A saucer swing set for young children should include at least one swing that has a backrest and safety strap.
These swings are great for both solo and group play, encouraging social interaction. They can be hung from trees or existing swing set frames and are ideal for lounging or active swinging.


8. Energetic Trampoline Fun
Trampolines have long been great ways for active kids to burn off excess energy.
Whether you have a full-sized, freestanding trampoline or a small bouncer pad for toddlers, try to include one in your backyard playground.
Prevent injuries from spoiling the fun by making sure your trampoline has a proper net enclosure. On a small toddler trampoline, a padded bar to hold on to is usually enough.

9. Safe Play with Artificial Grass
Artificial grass in play areas ensures a soft, cushioned surface, reducing the risk of injuries. It’s low maintenance and stays green year-round, making your playground look inviting.
Plus, it’s great for areas where natural grass might struggle to grow.

10. Mulch for Playground Safety
Mulch is not just for aesthetic appeal; it provides a safe landing for kids. It’s an affordable option that’s easy to install and maintain.
Opt for rubber or wood mulch to cushion falls and define play areas distinctly from the rest of your garden.

Backyard Playground FAQs
A playground’s surface is an important safety issue to consider. Its main purpose is to protect little ones from serious injuries while enjoying their play area. The materials most commonly used for backyard playground surfaces are:
- Wood mulch
- Rubber mulch
- Pea gravel
- Sand
- Living grass
- Artificial turf
- Rubber tiles
Most play equipment can be expected to last around eight to ten years. You should frequently inspect your backyard play area, searching for cracks, loose bolts, and broken objects. A poorly maintained playground structure may only last for five years. Wooden mulch will need refreshing every year or two.
10 Bathroom Flooring Ideas
“If no one ever took risks, Michaelangelo would have painted the Sistine floor.” – Neil Simon
What does your bathroom floor look like? If it’s a plain neutral-colored tile, then you are missing out on a prime opportunity for a custom flooring design. Bathroom tile is more than just a floor covering in your bathroom. It is a design element that can transform the look of your bathroom.
These bathroom flooring ideas will help you get inspired for your bathroom remodel. Start from the ground up with your bathroom makeover.
1. Hexagon Bathroom Tiles
Hexagon tiles bring a unique geometry to bathroom spaces, breaking away from traditional square or rectangular shapes. This design is ideal for adding visual interest without overwhelming the space. Hexagon tiles can range from small mosaics to larger formats, allowing for versatility in design. They work exceptionally well in both monochromatic schemes for a subtle look or in varied colors to create a focal point.


2. Patterned Bathroom Tiles
Patterned tiles are a bold choice, ideal for homeowners who want to make a statement. These tiles come in various designs, from intricate vintage motifs to modern geometric patterns. They are often used as an accent in a specific area, such as the shower or as a border, to add character. Patterned tiles can be the centerpiece of a bathroom’s design, dictating the choice of fixtures and accessories.


3. Multi-Colored Floor Tiles
Multi-colored tiles offer a vibrant and lively option for bathroom flooring. They can be used to create a mosaic effect, add a pop of color, or establish a color theme for the bathroom. Choosing harmonious colors can create a cohesive look, while contrasting shades can introduce an element of surprise. These tiles are excellent for family bathrooms or spaces needing a playful touch.

4. Concrete Look Bathroom Tiles
Concrete look tiles bring an industrial and contemporary edge to bathroom design. Their muted, neutral tones provide a sleek and modern appearance, fitting well with minimalist or industrial aesthetics. These tiles are also practical, offering the concrete look without the maintenance requirements of actual concrete. They pair well with metallic fixtures and natural wood accents.


5. White Marble Tiles
White marble tiles exude luxury and sophistication. Their natural veining adds texture and depth, making each tile unique. This classic choice reflects light, helping to make smaller bathrooms feel more spacious. White marble pairs beautifully with both chrome and brass fixtures and can be used to create a timeless, elegant bathroom interior.


6. Classic Ceramic Floor Tiles
Ceramic tiles are a versatile and durable option for bathroom flooring. They come in a wide range of colors, patterns, and finishes, making them suitable for any design aesthetic. Their resistance to moisture and ease of cleaning make them a practical choice for high-traffic bathrooms. Classic ceramic tiles can be laid in various patterns to add visual interest.


7. Non-Slip Floor Tiles
Safety and style meet in non-slip floor tiles. These tiles are designed with texture or matte finishes to provide extra grip in wet conditions. Ideal for family or elderly users, they reduce the risk of slips and falls. Non-slip tiles don’t compromise on aesthetics; they come in a range of colors and patterns, ensuring safety without sacrificing design.

8. Pebble Shower Floors
Pebble shower floors offer a spa-like experience, bringing a natural, organic element to the bathroom. Their textured surface not only massages the feet but also provides a natural non-slip quality. Pebbles can vary in size, color, and finish, allowing for customization to fit any bathroom theme, from tropical to Zen-inspired spaces.

9. Pastel Tiles
Pastel tiles lend a soft, calming vibe to a bathroom. These subtle hues, such as soft pinks, light blues, and mint greens, are perfect for creating a serene, spa-like atmosphere. They work well with natural light and can be complemented with neutral tones or used as a soft backdrop to bolder accents. Pastel tiles are ideal for achieving a gentle, yet stylish look.

10. Vinyl Flooring
Vinyl flooring is a practical, budget-friendly option with a wide range of design possibilities. It can mimic the look of wood, stone, or ceramic, providing a cost-effective alternative to these materials. Vinyl is water-resistant, durable, and comfortable underfoot, making it suitable for busy family bathrooms. It’s easy to install and maintain, perfect for quick renovations.


Bathroom Flooring FAQs
The most popular flooring option for bathrooms is tile. Porcelain and ceramic tiles are sturdy, durable, and waterproof. You can find tile in any color, shape, size, and pattern. When installed correctly and given proper care, tile floors can last many decades.
The easiest flooring to install is vinyl sheeting. However, it tends to look a bit cheap. The next easiest is vinyl plank flooring. It’s nicer because it has a more upscale look and can last for longer.
As long as you aren’t letting water pool, you should be fine to use laminate flooring in the bathroom. It’s durable enough to withstand dripping while you towel off after a shower. It’s also strong enough to withstand heavy traffic, dropped hot tools, and personal care products. It also resists staining. However, some laminate floor manufacturers do not recommend use of their products in the bathroom for fear of water damage.
Contents
